 Annotations Guide
PDF-XChange Editor can be used to create and edit document comments and annotations in multiple ways. Comments and annotations can be used to enhance documents and assist in the editing process. Click the links below for instructions on how to:
1. Click Tools in the Menu Toolbar.
2. Hover over Comment and Markup Tools.
3. Click Arrow Tool.
4. Follow the instructions detailed here.
|
1. Click Tools in the Menu Toolbar.
2. Hover over Comment and Markup Tools.
3. Click Callout Tool. The point will turn into a crosshairs icon.
4. Move the crosshairs to the desired location and click to create the callout annotation. See here for further information.
|
1. Click Tools in the Menu Toolbar.
2. Hover over Comment and Markup Tools.
3. Click Cloud Tool.
4. Follow the instructions detailed here.
|
1. Click Tools in the Menu Toolbar.
2. Hover over Comment and Markup Tools.
3. Click Pencil Tool.
4. Follow the instructions detailed here.
|
1. Click Tools in the Menu Toolbar.
2. Hover over Comment and Markup Tools.
3. Click Line Tool.
4. Follow the instructions detailed here.
|
1. Click Tools in the Menu Toolbar.
2. Hover over Comment and Markup Tools.
3. Click Oval Tool.
4. Follow the instructions detailed here.
|
1. Click Tools in the Menu Toolbar.
2. Hover over Comment and Markup Tools.
3. Click Polygon Tool.
4. Follow the instructions detailed here.
|
1. Click Tools in the Menu Toolbar.
2. Hover over Comment and Markup Tools.
3. Click Polygon Line Tool.
4. Follow the instructions detailed here.
|
1. Click Tools in the Menu Toolbar.
2. Hover over Comment and Markup Tools.
3. Click Rectangle Tool.
4. Follow the instructions detailed here.
|
Stamps can be used to display the status of documents. The Stamps Palette contains several preloaded stamps, and custom stamps can be created for specific purposes.
Figure 1. Stamps Palette
Follow the steps below to open and utilize the Stamp Tool:
1. Click Tools in the Menu Toolbar.
2. Hover over Comment and Markup Tools.
3. Click Stamp Tool.
4. Follow the instructions detailed here.
|
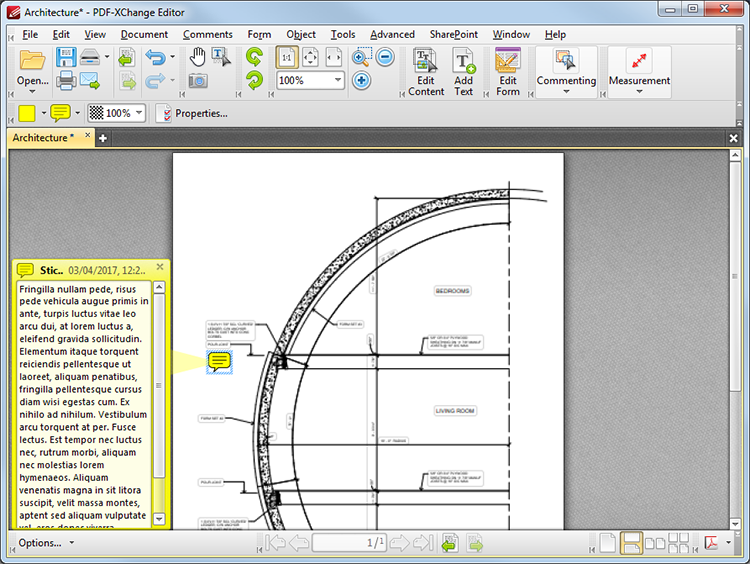
Sticky notes provide a convenient way to annotate documents. When a sticky note is completed it displays as a small icon within the document. Users can click the icon in order to view the content of the note. This makes it possible to store large amounts of text without taking up unnecessary space in the working area:
Figure 2. Expanded Sticky Note Annotation
Follow the steps below to open and utilize the Sticky Note Tool:
1. Click Tools in the Menu Toolbar.
2. Hover over Comment and Markup Tools.
3. Click Sticky Note Tool. The pointer will turn into a crosshairs icon.
4. Move the crosshairs to the desired location and click to create the sticky note annotation. See here for further information.
|
1. Click Tools in the Menu Toolbar.
2. Hover over Comment and Markup Tools.
3. Click Text Box Tool. The pointer will turn into a crosshairs icon.
4. Move the crosshairs to the desired location and click to create the text box annotation. See here for further information.
|
1. Click Tools in the Menu Toolbar.
2. Hover over Content Editing Tools.
3. Click Add Text Tool.
4. Follow the instructions detailed here.
|
1. Click Tools in the Menu Toolbar.
2. Hover over Comment and Markup Tools.
3. Click Typewriter Tool. The pointer will turn into a crosshairs icon.
4. Move the crosshairs to the desired location and click to create the typewriter-style annotation. A blue rectangle will appear. Enter the desired comment text in the rectangle. See here for further information.
|
1. Click Tools in the Menu Toolbar.
2. Hover over Comment and Markup Tools.
3. Click File Attachment Tool. The pointer will turn into a crosshairs.
4. Move the crosshairs to the desired location and click to create the link. The Open Files dialog box will open.
5. Select the desired file and click Open.
|
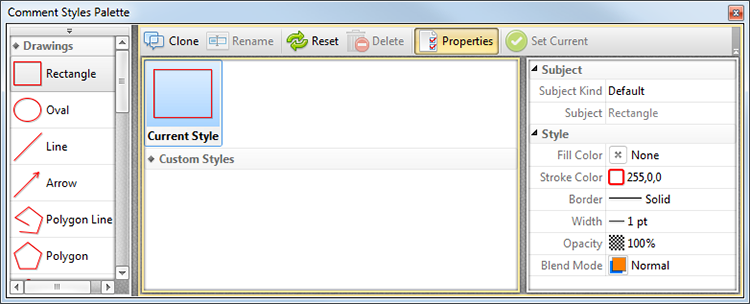
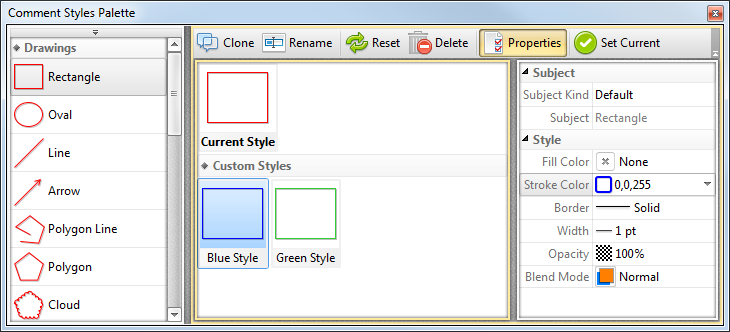
All comments and annotations can be customized to meet specific needs and aesthetic tastes with regard to style, color and other properties. If the same style is going to be used multiple times then it is useful to save the parameters. Follow the steps outlined below to do this:
1. Click Comments in the Menu Toolbar.
2. Click Comment Styles Palette. The Comment Styles Palette pane will open:
Figure 3. Comment Styles Palette
3. Select the desired comment style and click Clone. The style can then be edited and saved for subsequent use. See here for further information on the Comment Styles Palette.
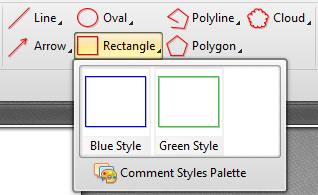
Right-click annotation icons in the Shortcut Toolbar for quick access to customized styles:
Figure 4. Customized Styles Shortcut
|
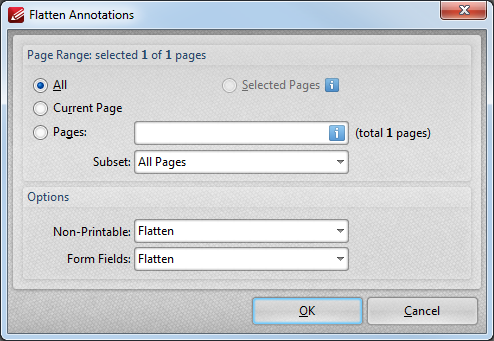
There is an important distinction to make when using PDF-XChange Editor to edit documents. This is because documents are composed of two layers. The first layer consists of the original PDF content, such as text and/or images. The second layer, which is placed over the first, consists of comments and/or markups added to the document using the software. These layers exist and operate independently of each other. This means that editing commands applied to original PDF content/comments and markups will apply only in relation to the layer in which selected items are located. When comments and markups are flattened they are moved to the same layer as original PDF content and can then be edited and utilized simultaneously. Follow the steps below to convert annotations into base content:
1. Click Comments in the Menu Toolbar.
2. Click Flatten Comments. The Flatten Annotations dialog box will open:
Figure 4. Flatten Annotations Dialog Box
3. Determine parameters as detailed here.
4. Click OK.
|
1. Click Tools in the Menu Toolbar.
2. Hover over Link Tools.
3. Click Link Creation Tool.
4. Follow the instructions detailed here.
|
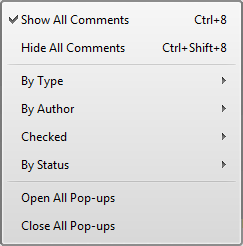
1. Click Comments in the Menu Toolbar.
2. Hover over Show Comments. The following menu will be displayed:
Figure 5. Show Comments Options
3. Follow the instructions detailed here.
|
1. Select the desired comments.
2. Click Object in the Menu Toolbar.
3. Click Duplicate Annotations.
4. Follow the instructions detailed here.
|
1. Select the comment text. Available parameters will be displayed in the Properties Toolbar.
2. Adjust parameters as detailed here.
|
1. Click Comments in the Menu Toolbar.
2. Click Export Comments to a Data File.
3. The Save File dialog box will open.
4. Enter a name for the file in the File name text box.
5. Click Save.
|
1. Click Comments in the Menu Toolbar.
2. Click Import Comments. The Open Files dialog box will open.
3. Select the file that contains the desired comments and click Open.
|
1. Select the desired comments.
2. Click Object in the Menu Toolbar.
3. Click Transform Selection.
4. Follow the instructions detailed here.
|
1. Click Comments in the Menu Toolbar.
2. Click Comment Styles Palette. The Comment Styles Palette will open:
Figure 2. Comment Styles Palette
3. Select the desired style.
4. Click Reset.
|
1. Select the desired comments.
2. Click Object in the Menu Toolbar.
3. Click Transform Selection.
4. Follow the instructions detailed here.
|
1. Select the desired comments.
2. Click Object in the Menu Toolbar.
3. Click Transform Selection.
4. Follow the instructions detailed here.
|
PDF-XChange Editor displays the current comment style for annotation tools in the Shortcut Toolbar. This style will be selected automatically when the associated tool is selected. The default comment/annotation style is selected by default. Follow the steps below to set a customized style as the default setting for the tool:
1. Click Comments in the Menu Toolbar.
2. Click Comment Styles Palette. The Comment Styles Palette will open and customized styles will be displayed:
Figure 3. Comment Styles Palette
3. Select the desired style and click Set Current.
|
Editing options are available after tools have been used to create content. See here for further information.
Additionally, several of the Keyboard Shortcuts relate to annotations.