 Recompress Images
The Recompress Images action recompresses document images. It contains the following customizable parameters:
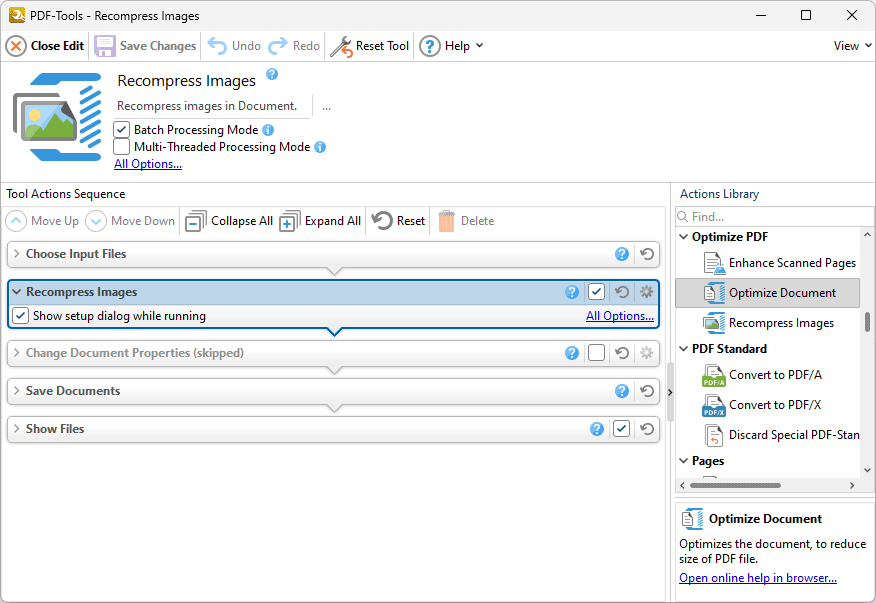
Figure 1. Recompress Images Action Options
•Click All Options to view/edit all options. The Recompress Images dialog box will open, as detailed below.
•Select the Show setup dialog while running box to launch the Recompress Images dialog box and customize settings each time this action is used. Clear this box to disable the Recompress Images dialog box from opening each time the action is used, which is useful when the same settings are used consistently.

Figure 2. Recompress Images Dialog Box
•Use the Page Range options to determine the page range of images to be recompressed. Page range settings are detailed here. Alternatively, select the Selected Graphic button to recompress only the graphic currently selected in the document.
•Select a recompression option in the pane to determine the type of image recompression for the operation. Note that you can click Edit or Reset to edit/reset recompression settings.
•Select the Replace all instances box to replace all instances of the graphic that is being recompressed in cases where the graphic appears multiple times in the same document.
•Select the Replace when size of new image is smaller than size of original image box to replace recompressed images when they are smaller than the source image used to create them.
•Use the Settings dropdown menu to determine the quality of the recompression. Note that increasing quality will increase the file size and vice versa.
Click OK to save changes.
Settings
Click the Settings dropdown menu to toggle between preset modes or save/manage custom settings:
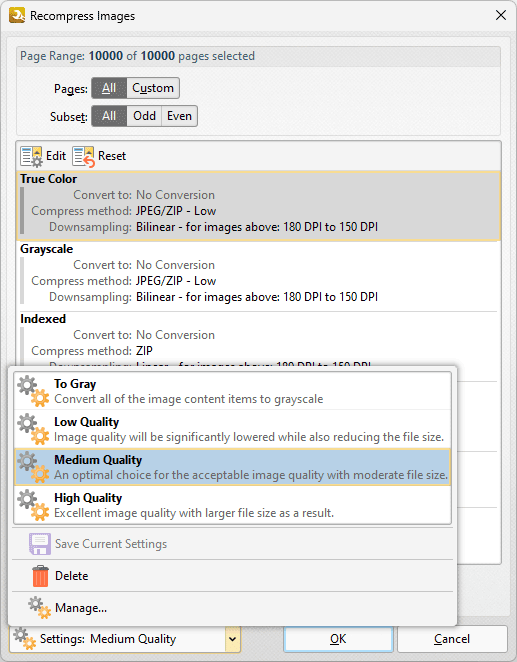
Figure 3. Recompress Images Preset Options
•Select a present mode from the list as desired.
•Click Save Current Settings to save custom settings for subsequent use. Saved profiles are detailed in the Settings dropdown menu.
•Click Delete to delete selected profiles.
•Click Manage to manage saved custom settings. The Manage Presets dialog box will open, as detailed below.
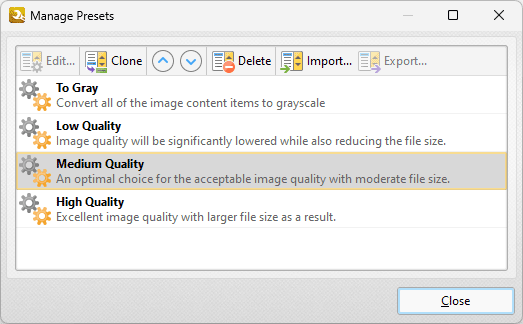
Figure 4. Manage Presets Dialog Box
•Click Edit to edit selected profiles.
•Click Clone to clone selected profiles. This makes it possible to duplicate profiles and then customize their settings whilst retaining the existing profile and its parameters.
•Use the up and down arrow to move selected profiles up or down in the list.
•Click Delete to delete selected profiles.
•Click Import to import profiles from a saved file.
•Click Export to export profiles to file.