 Get Images from Scanner
The Get Images from Scanner action sources images from the local scanner for use with with other actions from the Actions Library. It contains the following customizable parameters:
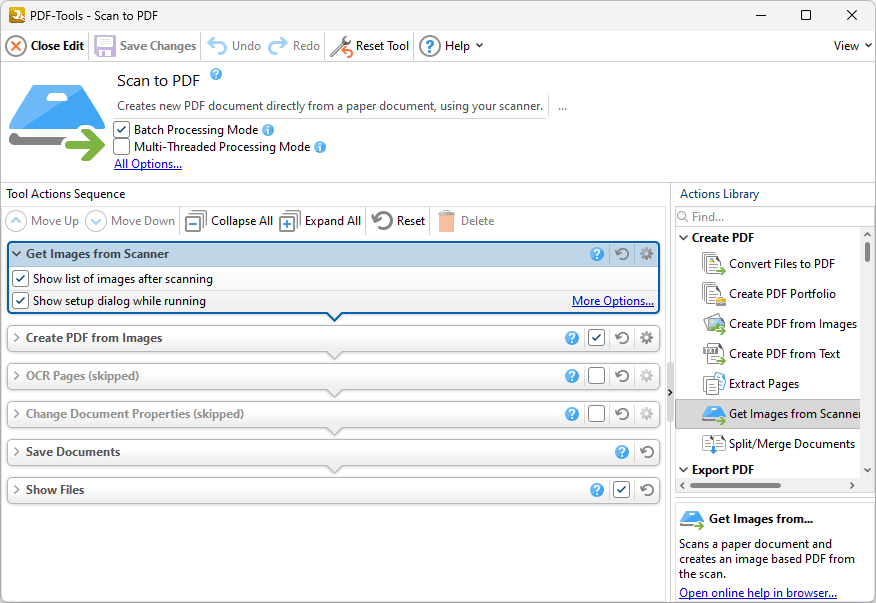
Figure 1. Get Images from Scanner Action Options
•Click More Options to determine scan parameters. The Scan Properties dialog box will open, as detailed below.
•Select the Show setup dialog while running box to launch the Scan Properties dialog box and customize scan parameters each time this action is used. Clear this box to disable the Scan Properties dialog box from opening each time the action is used, which is useful when the same settings are used consistently.
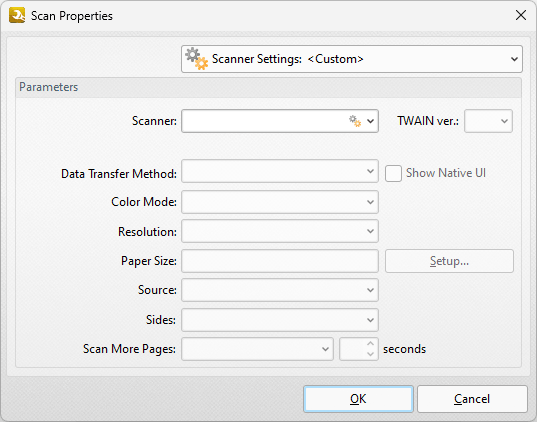
Figure 2. Scan Properties Dialog Box
•Use the Scanner Settings dropdown menu to save/select scanning profiles, as detailed in (figure 3).
•Use the Scanner dropdown menu to determine the scanner used to source images.
•Select either Native Mode or Memory Mode in the Data Transfer Method dropdown menu:
•Native Mode uses a single memory buffer. This is the default and fastest mode, and is compatible with the broadest range of scanners.
•Memory Mode enables the use of multiple memory buffers. This is a useful function in cases where memory is low and/or when large images are being scanned.
•The Show Native UI box is selected by default, which means the user interface of the device driver is used. This is the most reliable option, and the scanner will select certain parameters of the scan itself: Color Mode, Resolution, Paper Size and Source. Clear the Show Native UI box to customize these options:
•Use the Color Mode dropdown menu to select Auto detect, Color, Grayscale or Black & White as the format of scanned documents.
•Use the Resolution dropdown menu to set the dpi (dots per inch) of scanned documents.
•Use the Paper Size number box to determine the paper size of scanned documents. Click Setup for further options:
•Select Automatic to allow the paper size to be determined automatically.
•Select Standard to use an industry-standard paper size.
•Select Custom to use custom dimensions.
•Use the Source dropdown menu to specify Auto, Flatbed or Feeder as the type of scanner used in the operation.
•Use the Sides dropdown menu to determine which sides of documents are scanned. There are three options: Simple Scan, Manual Duplex and Manual Duplex Reversed. Click the dropdown arrow on the right side of the box to view an explanation of these options.
•Use the Scan More Pages dropdown menu and number box to determine when additional pages are scanned.
Click OK to save changes.
Scanner Settings
Use the Scanner Settings dropdown menu to select preset scanning modes or save/manage/delete custom settings:
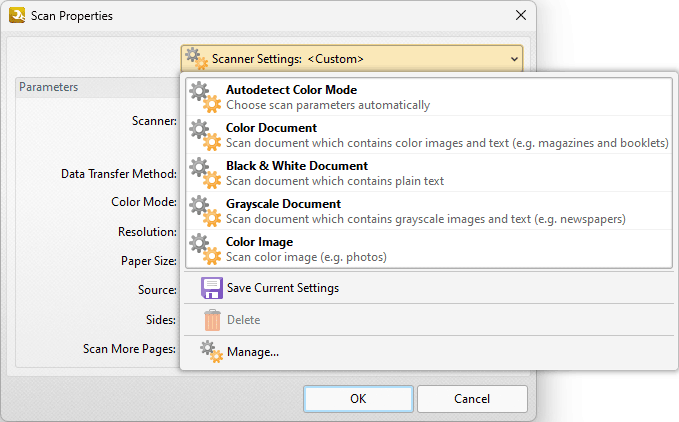
Figure 3. Scanner Settings Dropdown Menu Options
•Select predefined modes as desired.
•Click Save Current Settings to save the current settings as a profile for subsequent use.
•Click Delete to delete selected profiles. Note that this option is only available for customized profiles.
•Click Manage to manage preset/customized profiles. The Manage Presets dialog box will open:
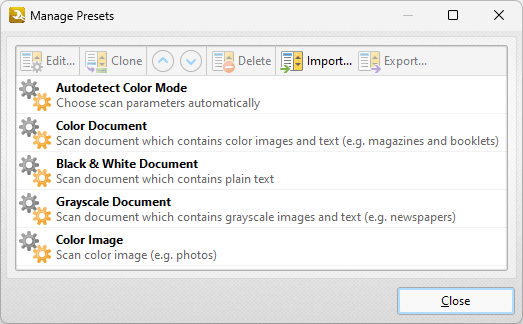
Figure 4. Manage Presets Dialog Box
•Click Edit to edit selected profiles. Note that this option is only available for customized profiles.
•Click Clone to clone selected profiles. This option can be used to customize the settings of preset profiles, which cannot be customized in their default state.
•Use the up and down arrows to move selected profiles up or down in the list.
•Click Delete to delete selected profiles. Note that this option is only available for customized profiles.
•Click Import to import profiles from a saved file.
•Click Export to export profiles to file.