 Add Watermarks
The Add Watermarks action adds watermarks to documents. Watermarks are used predominantly to discourage counterfeiting. The following options are available when this action is placed in the Tool Actions Sequence:
![]()
Figure 1. Add Watermarks Options
•Show setup dialog while running is explained here.
•Click All Options to determine further options:
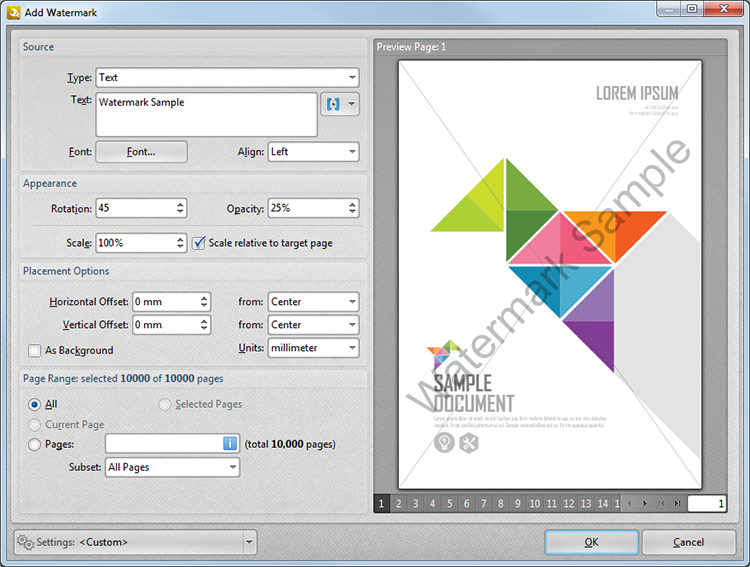
Figure 2. Add Watermark Dialog Box
•The Source options determine the source of the watermark. The Type dropdown menu determines the watermark format:
•Text inserts a text-based watermark:
•Enter the watermark text in the Text text box.
•Click the blue icon to add macros.
•Click the Font button to determine font parameters.
•Select an option from the Align dropdown menu to determine the watermark alignment.
•File inserts an image file as the watermark:
•Enter the name of the file in the Name text box or click the file icon to select a file.
•Enter the page to be used as the watermark in the To Page number box.
•The Appearance options determine the rotation, opacity and scale of the watermark.
•The Placement options determine the horizontal and/or vertical offset of the watermark from the left, right or center of the document.
•Select the As Background box to relocate watermarks from the foreground to the background.
•The Page Range options are detailed here.
•The Preview Page pane displays watermark previews. Select the numbers beneath the pane to preview corresponding document pages.
•The Settings menu features two preset watermarks: Draft and Confidential. This menu can also be used to save customized settings:
•Click ![]() to save the current settings.
to save the current settings.
•Click ![]() to delete the custom settings currently selected.
to delete the custom settings currently selected.
•Click ![]() to manage settings that have been saved previously.
to manage settings that have been saved previously.
Click OK to save settings. Then, in the Edit Tools window::
•Click ![]() Save Changes to save new settings.
Save Changes to save new settings.
•Click ![]() Close Edit to end the current edit and revert to previous settings.
Close Edit to end the current edit and revert to previous settings.