 Print Document
The Print Document action is used to print input documents. It contains the following customizable parameters:
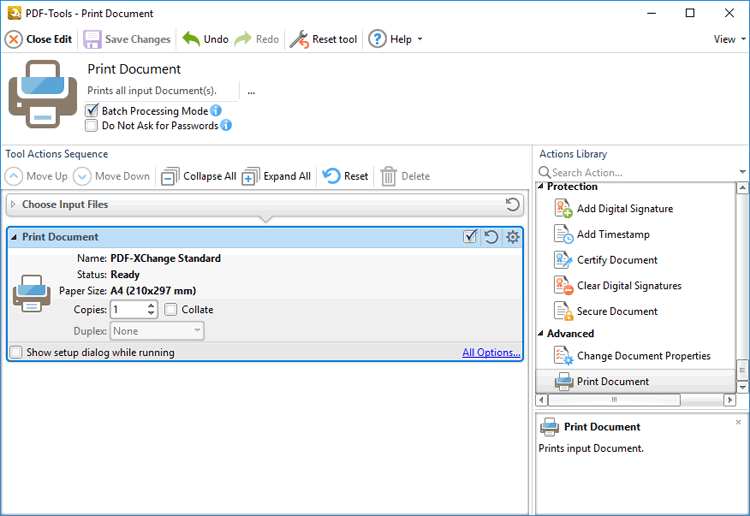
Figure 1. Print Document Action Options
•Details about the current printer and paper size are displayed in the upper section of the action.
•Enter the desired number of copies in the Copies number box and select the Collate box to collate output.
•Select an option in the Duplex dropdown menu to specify the type of duplex printing used when using this action in conjunction with printers that support duplex printing.
•Click All Options to view/edit all options. The Print dialog box will open, as detailed below.
•Select the Show setup dialog while running box to launch the Print dialog box and customize settings each time this action is used. Clear this box to disable the Print dialog box from opening each time the action is used, which is useful when the same settings are used consistently.
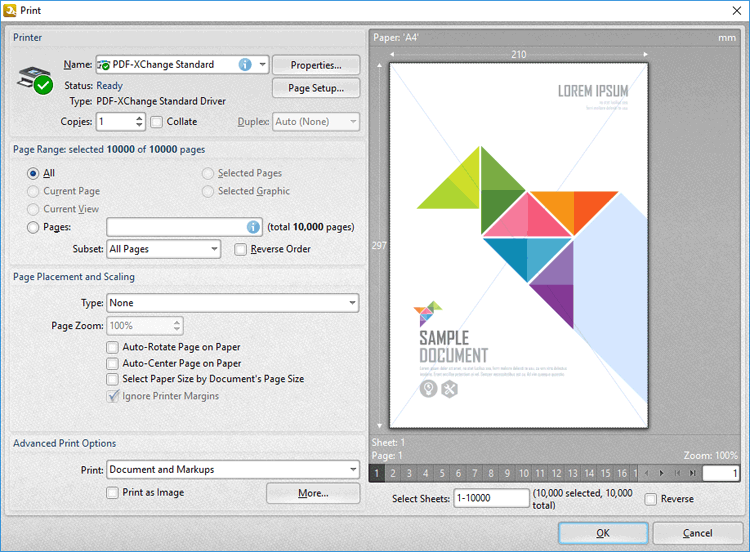
Figure 2. Print Dialog Box
•The options in the Printer section determine the printer to be used and its associated settings:
•Use the Name text box to select a printer to use.
•Use the Copies text box to determine how many copies of the document are printed.
•Select the Collate box to collate document pages. This is a useful feature when printing multiple copies of multi-page documents. It prints entire copies of the document together, as opposed to multiple copies of each page at a time.
•Click the Properties button to open the Properties dialog box for the selected printer.
•Click the Page Setup button to open the Page Setup dialog box. See (figure 3) below.
•The options in the Page Range section determine which pages of the document will be printed:
•Select All, Current Page or Current View.
•Use the Pages box to determine which pages of the document are printed. See here for further information.
•Use the Subset option to select All Pages, Odd Pages Only or Even Pages Only.
•Select the Reverse Order box to print documents in reverse numerical order.
•The options in the Pages Placement and Scaling section determine the placement and scaling of the document:
•Use the Type menu to select a standard placement setting. When a setting is selected its features will be shown in the preview window. Each setting has further options that become available when the setting is selected. The effect that these have will be shown in the preview window when they are adjusted.
•Use the Page Zoom number box to determine the level of zoom on the page. Select the check boxes to enable further settings.
•The options in the Advanced Print Options tab determine advanced printing options:
•Use the Print menu to determine which elements of the document are printed. Click More for further options. See (figure 4) below.
•Select the Print as Image box to print the selected pages as images.
•When the desired parameters have been selected, click Print to print the document.
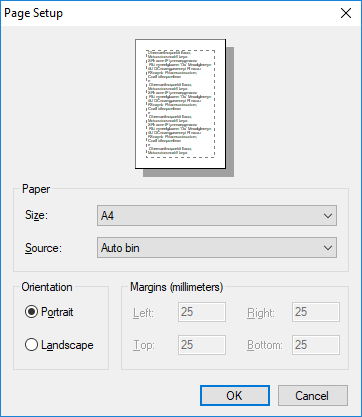
Figure 3. Page Setup Dialog Box
•Select a size for the document from the Size menu.
•Select a source for the document from the Source menu.
•Use the option buttons to select either Portrait or Landscape as the orientation for the document.
•Click OK to apply changes.
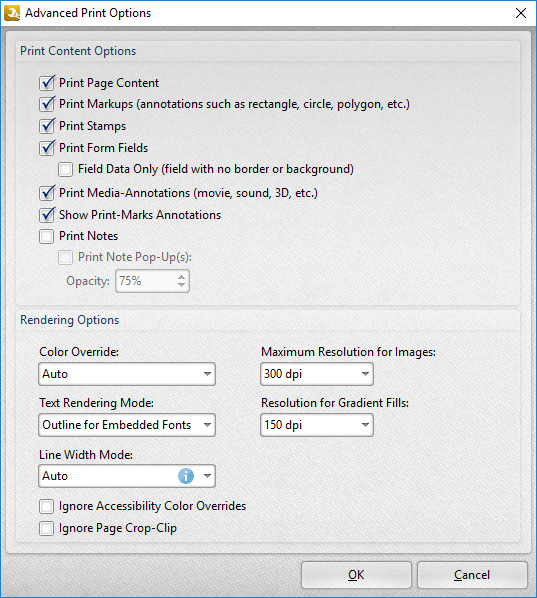
Figure 4. Advanced Print Options Dialog Box
•Use the Print Content Options to determine printed document content.
•Use the Rendering Options to determine how documents are rendered:
•Use the Color Override dropdown menu to determine color override options:
•Auto permits PDF-XChange Editor to select the color override setting.
•Grayscale prints documents in grayscale.
•Monochrome prints documents in monochrome.
•Color prints documents in color.
•Use the Text Rendering Mode dropdown menu to determine how text is rendered:
•Auto permits PDF-XChange Editor to select the text rendering mode. Additionally, it should be noted that this option is required in order to print embedded fonts.
•Outline for Embedded Fonts prints embedded fonts as outlines, which are vector images.
•Outline Always prints all fonts as outlines.
•Bitmap for Embedded Fonts prints embedded fonts as bitmap images.
•Bitmap Always prints all fonts as bitmap images.
•Use the Maximum Resolution for Images dropdown menu to set the maximum resolution of images in printed documents.
•Use the Resolution for Gradient Fills dropdown menu to determine the resolution used for gradient fills.
•Select the Ignore check boxes as desired.
Click OK to save changes.