 Licensing
The PDF-XChange licensing system offers both the standard serial key method of licensing applications as well as the option of using a license file.
Adding and Activating Your Serial Key in PDF-XChange Editor
When an evaluation copy of PDF-XChange Editor is being used all output is generated with two watermark stamps on each page. When a license key has been purchased the serial number provided must be entered into the software to ensure that all subsequent output is free of the evaluation watermarks. (Instructions on how to remove trial watermarks after you have added your license key are available here). You will receive a license key immediately after making a purchase of a PDF-XChange Editor license. This license key is included in the purchase order receipt and can also be accessed via your user account located here. Follow the steps below to add and activate your license key:
1. Open PDF-XChange Editor, then click the Edit tab and click Preferences:

Figure 1. File Tab, Preferences Highlighted
The Preferences dialog box will open.
2. Click the Registration category in the list of categories on the left. The Registration options will be displayed:
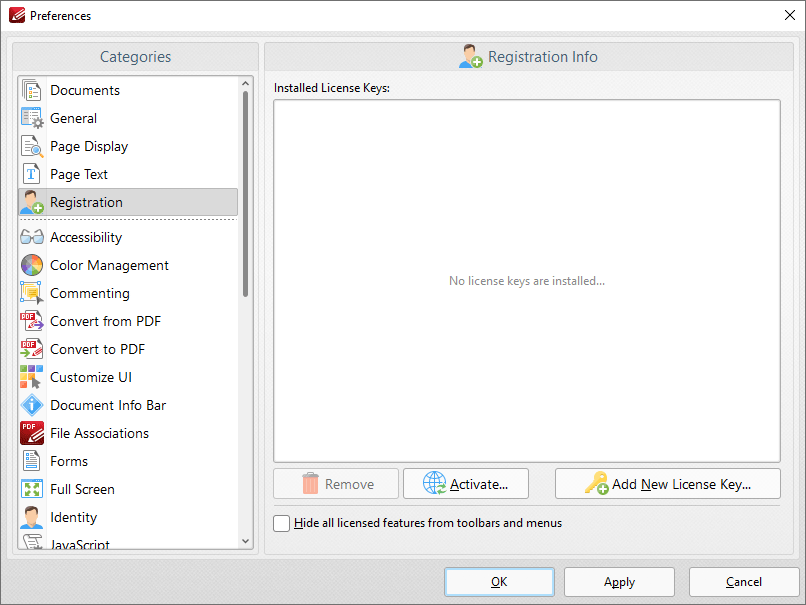
Figure 2. Preferences Dialog Box, Registration Preferences
3. Click Add New License Key to add your license key to the software. The Add New License Key/Activation Code dialog box will open:

Figure 3. Add New License Key/Activation Code Dialog Box
4. Paste your license key into the dialog box and then click Continue to add the key.
5. Click Activate in the Registration preferences dialog box to activate your key:
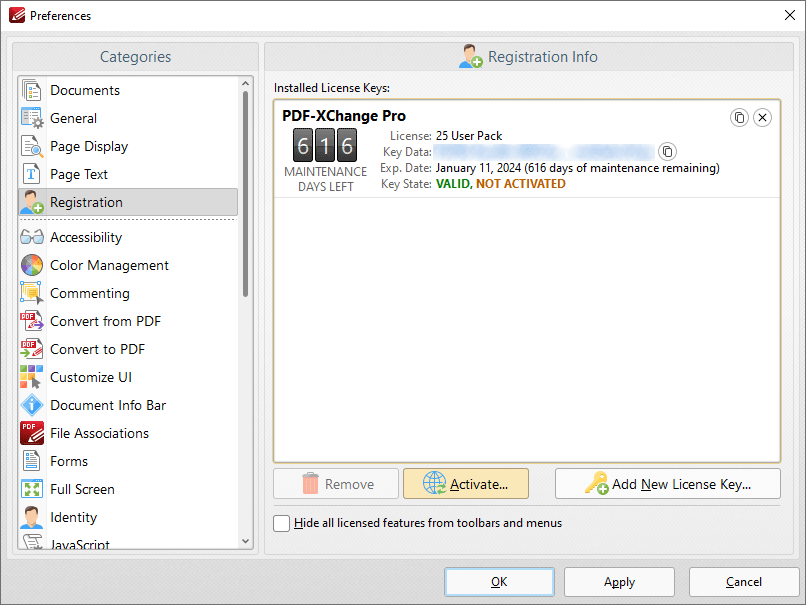
Figure 4. Preferences Dialog Box, Registration Preferences, Activate Button Highlighted
You can then select to either Activate via Internet, which is the recommended option as it takes a matter of seconds to complete, or to Activate Manually (Offline), which is intended only for machines that do not have an internet connection.
Using a License File to Add Your Serial Key to PDF-XChange Editor
The main benefit of this feature is that it avoids the need to reinstall the software if you are using an evaluation version and intend to upgrade. Follow the steps below to access and activate license (.xcvault) files:
1. Login to your account with PDF-XChange.
2. Move to the "Your Products and Serial Keys" tab.
3. Move to the desired product and click the arrow icon indicated below, which will expand the window:
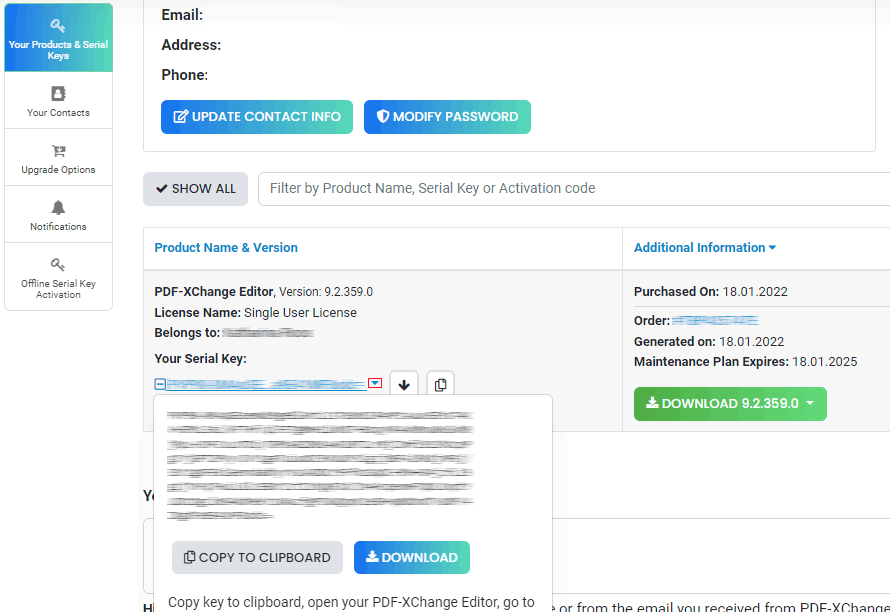
Figure 5. XCVault File Access Point
4. Click the Download button. The .xcvault file will then download.
5. Click the download icon to launch the .xcvault file. All product licenses will then update automatically.
System administrators should note that this information is stored within the Windows Registry. However, the method used to license the application can have an effect on the storage location. When an .xcvault file is being used, its information is stored in two locations: HKCU\Software\Tracker Software\Vault and HKLM\SOFTWARE\Tracker Software\Vault. It should also be noted that license information is stored as a hexadecimal value. Therefore, if a registration key is being used to deploy the license, it is advisable to first license a single machine in order to create the first registration key.
Standard Deployment
Copy and paste serial keys into the installer to implement them during installation. Alternatively, click the personal.xcvault file after installation has taken place.
Silent Deployment
.xcvault files can also be used for silent deployment of serial keys after installation has taken place. A windows command line can be used to push the .xcvault file to each user that qualifies for a full license. The command line for operation is: XCVault.exe /Option <path_to_xcvault_file>. Available command line options are detailed below:
See here for information about management of licenses for PDF-XChange Editor on Windows Terminal Servers.
XCVault Command Line Options
/Install
This command designates the utility as the default handler of .xcvault files in the system. Please note that this requires administrative rights.
Example
xcvault.exe /Install
/AddKeys
This command installs all keys from .xcvault files.
Syntax
xcvault.exe [/AddKeys] <xcvault_file> [/M|/S|/R]
/M – specifies that new keys are added in the HKEY_LOCAL_MACHINE registry section and administrative rights are required.
/R – specifies that new keys will be unencrypted when added. Please note that this does not affect existing keys.
/S – specifies that the command is not permitted to show error/information messages.
Examples
xcvault.exe /AddKeys "c:\Personal.xcvault"
xcvault.exe "c:\Personal.xcvault"
/AddKeyData
This command installs the specified key.
Syntax
xcvault.exe [/AddKeyData] <keystring> [/M|/S|/R]
/M – Installs key into HKLM for per-machine use. This option requires administrative rights. If this option is not specified then key will be installed in HKCU for per-user use and administrative rights are not required.
/S – specifies that the command is not permitted to show error/information messages.
/R – specifies that new keys will be unencrypted when added. Please note that this does not affect existing keys.
Example
xcvault.exe /AddKeyData <keystring>
/OpenKeys
This command stores all keys in an open form, instead of encrypting them by machine-specific ID. This option is useful for terminal servers that have a load-balancing and/or VDI environment.
Syntax
xcvault.exe /OpenKeys [/M|/S]
/M – decrypts keys only in the per-machine store (HKLM). This option requires administrative rights. If it is not specified then the keys will be changed only in the per-user store (HKCU).
/S – specifies silent mode and suppresses any messages with information about results.
Example
xcvault.exe /OpenKeys
/ProtectKeys
This command is the opposite of the "OpenKeys" command:
Syntax
xcvault.exe /ProtectKeys [/M|/S]
/M – encrypts keys only in the per-machine store (HKLM). This option requires administrative rights. If it is not specified then the keys will be changed only in the per-user store (HKCU).
/S – specifies silent mode and suppresses any messages with information about results.
Example
xcvault.exe /ProtectKeys
/ActivateKeys
This command activates installed keys.
Syntax
xcvault.exe /ActivateKeys [/S|/AA]
/S – specifies silent mode and suppresses any messages with information about results.
/AA – specifies that currently activated keys will be reused in the activation process.
Example
xcvault.exe /ActivateKeys
/RemoveKeys
This command removes all license keys for all products from the per-user store (HKCU). If the per-machine store (HKLM) is available for modification then all keys will be removed from it, otherwise keys from this store will be marked as removed for only the current user.
Syntax
xcvault.exe /RemoveKeys [/S|
/S – specifies silent mode and suppresses any messages with information about results.
Example
xcvault.exe /RemoveKeys
/Cleanup
This command removes all license-related information for all installed products from per-machine (HKLM) and per-user (HKCU) stores. If the per-machine store is not empty then administrative rights are required.
Syntax
xcvault.exe /Cleanup [/S|
/S – specifies silent mode and suppresses any messages with information about results.
Example
xcvault.exe /Cleanup
A sample script and associated literal path is detailed below:
C:\Program Files\Tracker Software\Vault>XCVault.exe /S with literal path D:\Documents\Ref\Personal.xcvault
Activating silent deployment is a two-step process. The first step is to call on the xcvault.exe that will apply the key. The second step is to specify the literal path to the personal.xcvault file. The presence of the script means that users are not notified of serial key deployment.
Passing License Details During Installation
The inclusion of .xcvault files since version 5.5 and build 308 means that the command line install option KEY=<regkey> no longer passes license details to associated products. The command line can be used to resolve this issue and there are two methods available:
The first method is to use the option KEYFILE=<xcvault file> to specify the UNC location of the license vault file <filename>.xcvault. For example:
KEYFILE="C:\Users\JohnDoe\Desktop\Personal.xcvault".
The second method is use the option KEYDATA=<regkey> to specify the registration key with a text string. For example:
KEYDATA="PXP70-Y5EN....cFrBqnyKhv7eOw=".
The first method is recommended as the new keys are very complex and therefore less suited to being passed as strings at the command line. The details of these switches and examples of their use are available here.