 Choose Input Files
The Choose Input Files action sources files for use in conjunction with other actions in PDF-Tools. It contains the following customizable parameters:
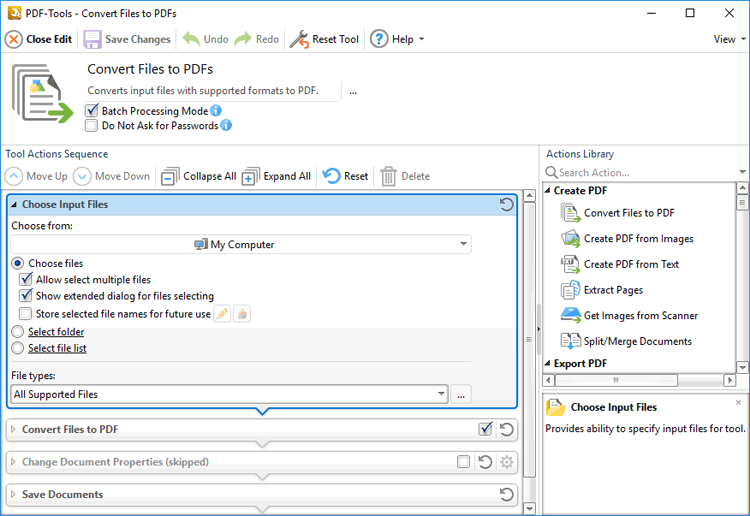
Figure 1. Choose Input Files Action Options
•Use the Choose From dropdown menu to determine where source files are taken from:
•Click My Computer to use files from the local computer.
•Hover over Add Place to add a new place from which to take files, then click Box.com, Dropbox, Google Drive, OneDrive or Sharepoint to add accounts from these locations. PDF-Tools will prompt for the login information for the selected account. When this information has been entered, the account will be detailed in the list and can be used to source files as desired.
•Select Choose files to source individual input files. If this option is selected then the following options are available:
•Select the Allow select multiple files box to enable the selection of multiple files.
•Select the Show extended dialog for files selecting box to launch the Choose Input Files dialog box each time this action is used. The Choose Input Files dialog box is detailed in (figure 4). It is used to view, edit and reorder input files. Clear the Allow extended dialog for files selecting box to disable the launching of the Choose Input File dialog box each time this action is used.
•Select the Store selected file names for future use box to create a record of the input files used next time the tool runs. These files will be added automatically on subsequent runs of the tool. Click the pencil icon to view/edit stored files, or the brush icon to remove stored files. Note that if this option has been used to store files for subsequent use then it is not possible to select different files for use with the tool.
•Select Select folder to source all files from one folder to use as input files. Parameters for this setting are detailed in (figure 3).
•Select Select file list to source files from a list of files. Note that files must saved with the extension (*.pdtfl) to be compatible with this option. List files can be created in text editors such as Microsoft Notepad, and should contain only a list of source files. For example:
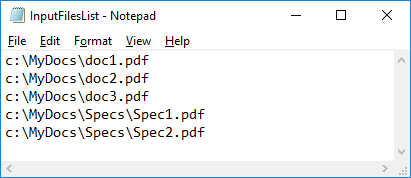
Figure 2. Sample List File
•Select an option in the File types dropdown menu to determine the permitted file types for the Choose Input Files action. Click the ellipsis icon to view/edit Available File Filters.
Select Folder Options
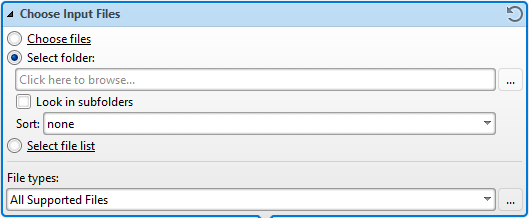
Figure 3. Select Folder Options
•Click the text box or the ellipsis icon to select a folder.
•Select the Look in subfolders box to include files located in subfolders.
•Select an option in the Sort dropdown menu to determine the order in which input files are processed.
Choose Input Files
The Choose Input Files dialog box is used to view, edit and reorder input files:
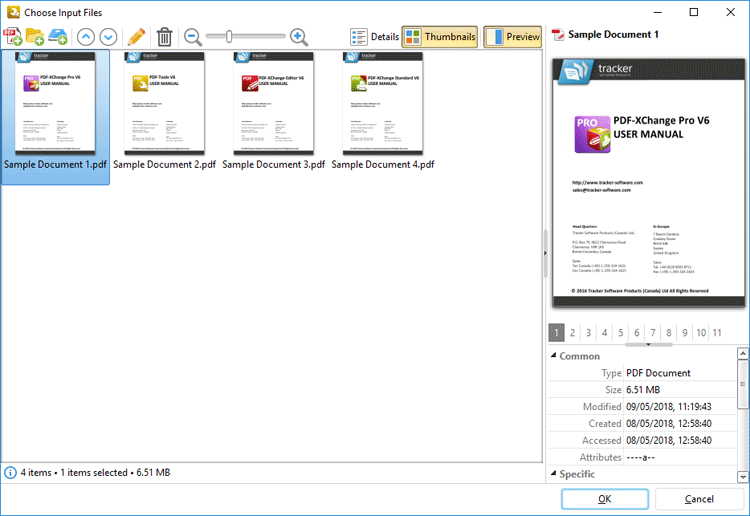
Figure 4. Choose Input Files Dialog Box
![]() Click Add Files to add files from the local computer.
Click Add Files to add files from the local computer.
![]() Click Add Folder to add all files from a specified folder.
Click Add Folder to add all files from a specified folder.
![]() Click Add From Scanner to add input files via a scanner. The Scan Properties dialog box will open, which is used to determine scanning parameters. Further information on this dialog box is available here.
Click Add From Scanner to add input files via a scanner. The Scan Properties dialog box will open, which is used to determine scanning parameters. Further information on this dialog box is available here.
![]() Click Move Up to move selected files up in the order of processing.
Click Move Up to move selected files up in the order of processing.
![]() Click Move Down to move selected files down in the order of processing.
Click Move Down to move selected files down in the order of processing.
![]() Click Edit to edit selected image files. The Edit Image dialog box will open. This dialog box is detailed in (figure 5).
Click Edit to edit selected image files. The Edit Image dialog box will open. This dialog box is detailed in (figure 5).
![]() Click Zoom Out or
Click Zoom Out or ![]() Zoom In, or use the slider, to zoom out from/in on page thumbnails.
Zoom In, or use the slider, to zoom out from/in on page thumbnails.
![]() Click Delete to remove selected files from the dialog box.
Click Delete to remove selected files from the dialog box.
![]() Click Details to view the details of files added to the dialog box. Alternatively, click
Click Details to view the details of files added to the dialog box. Alternatively, click ![]() Thumbnails to view files as thumbnails.
Thumbnails to view files as thumbnails.
![]() Click Preview to view a post-conversion preview of selected files, which will display on the right of the dialog box, as detailed in (figure 4).
Click Preview to view a post-conversion preview of selected files, which will display on the right of the dialog box, as detailed in (figure 4).
Click OK to proceed with the tool operation.
Edit Image
The Edit Image dialog box is used to edit images before they are processed by tools:
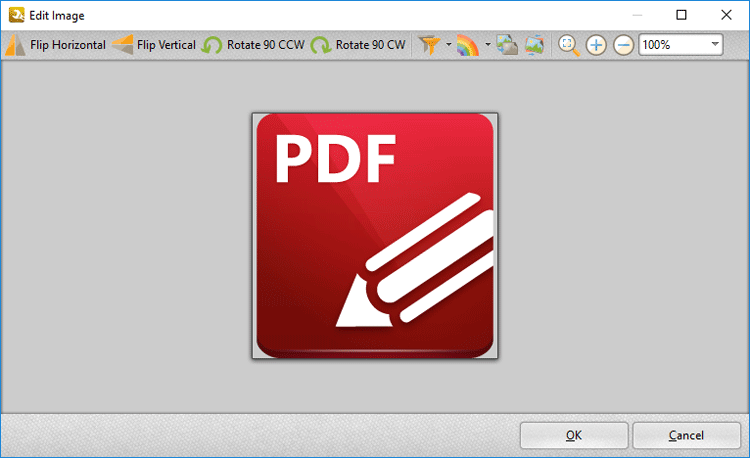
Figure 5. Edit Image Dialog Box
![]() Click Flip Horizontal to flip images horizontally.
Click Flip Horizontal to flip images horizontally.
![]() Click Flip Vertical to flip images vertically.
Click Flip Vertical to flip images vertically.
![]() Click Rotate 90 CCW to rotate images ninety degrees counter-clockwise.
Click Rotate 90 CCW to rotate images ninety degrees counter-clockwise.
![]() Click Rotate 90 CW to rotate images ninety degrees clockwise.
Click Rotate 90 CW to rotate images ninety degrees clockwise.
![]() Click the Apply Filter dropdown menu to view/select filters for images.
Click the Apply Filter dropdown menu to view/select filters for images.
![]() Click the Convert to dropdown menu to view/select color depths for images.
Click the Convert to dropdown menu to view/select color depths for images.
![]() Click Grayscale to convert images to grayscale format.
Click Grayscale to convert images to grayscale format.
![]() Click Deskew to deskew images. Deskewing is used to straighten the edges of images that have been scanned/photographed crookedly.
Click Deskew to deskew images. Deskewing is used to straighten the edges of images that have been scanned/photographed crookedly.
![]() Click Fit Visible to fit images to the border of the editing pane.
Click Fit Visible to fit images to the border of the editing pane.
![]() Click the Zoom In or
Click the Zoom In or ![]() Zoom Out button to zoom in on/out from images, or use the number box to adjust the zoom level manually.
Zoom Out button to zoom in on/out from images, or use the number box to adjust the zoom level manually.
Click OK to save changes and proceed with the tool operation.