 Profiles
The Profile section is used to save customized printer settings for subsequent use:
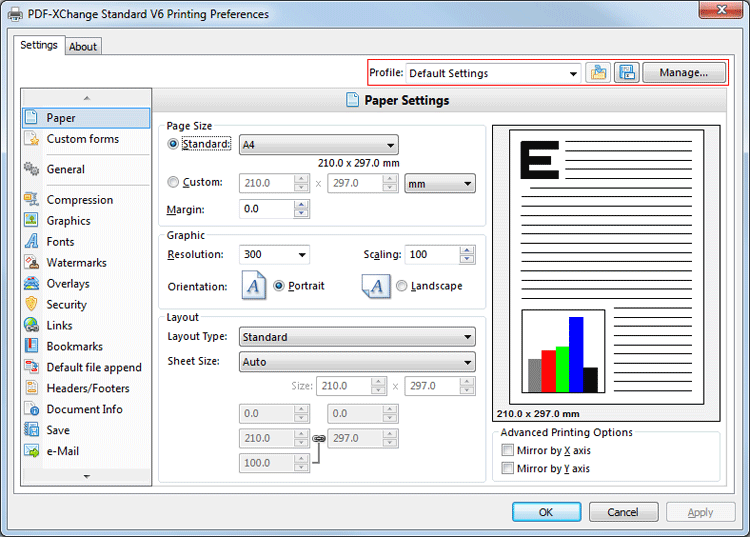
Figure 1. PDF-XChange Standard V6 Printing Preferences Dialog Box. Profile Options Highlighted
Click the disk icon to open the Add Profile dialog box:
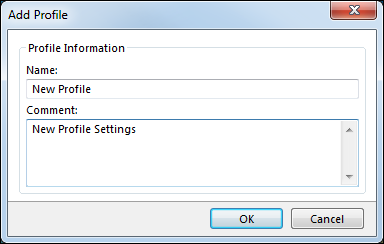
Figure 2. Add Profile Dialog box
•Use the Name text box to enter a name for the profile.
•Use the Comment text box to add a description of the profile.
•Click OK to save profiles. They will then be available in the Profile submenu.
•Click the Manage button in (figure 1) to manage saved profiles. The Profiles Manager dialog box will open:
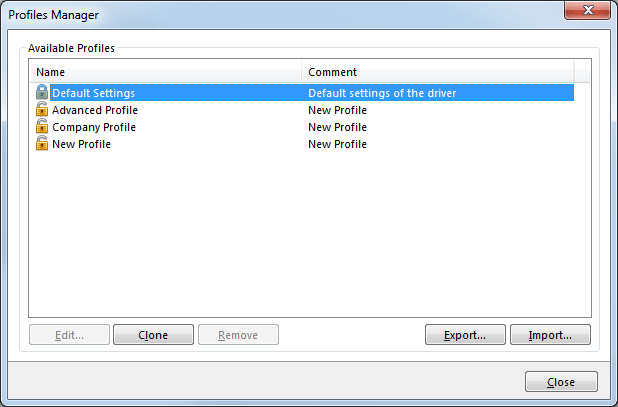
Figure 3. Profiles Manager Dialog Box
•Click Edit to edit selected profiles. The Edit Profile dialog box will open. Edit the Name and Comment of the profile and click OK to save changes.
•Click Clone to clone selected profiles. This enables the editing of profile settings without changing the original profile. The Clone Profile dialog box will open. Edit the Name and Comment of the profile and click OK to save changes.
•Click Remove to remove selected profiles.
•Click Export to export selected profiles. They will save as a (*.pp5) file that can be uploaded to other installations of PDF-XChange Standard (for example on different computers within the same company).
•Click Import to import settings that the Export feature has been used to export. Alternatively, rundll32 can be used to install profiles. Available options are detailed below. See here for further information on rundll32.
RUNDLL32 OPTION
There is also a rundll32 option for profiles:
rundll32 "C:\Program Files\Tracker Software\PDF-XChange 6\DrvUI6.dll",DUI30_Command [/InstallProfile:"<fullpathtoprofile>" | /SetDefProfile:"<profile_name>"] [/PrinterName:"PDF-XChange Standard V6"] [/AsDefault] [/ForUser]
The rundll32 is composed of the following components:
•/InstallProfile:"<fullpathtoprofile>", which installs a profile from the path specified. If /AsDefault is specified then the profile will be set as the default profile.
•/AsDefault, which is used in conjunction with the /InstallProfile command. If it is specified then the new profile will become the default profile.
•/SetDefProfile:"<profile_name>", which sets the profile specified as the default profile. For example: /SetDefProfile:"Current".
•/PrinterName, which specifies the printer to which changes are made. If no printer is specified then the default printer will be used.
•/ForUser, which changes the profile for only the current user. If this property is not specified then the profile is changed for all users.