 Export PDF to Microsoft Excel Spreadsheet
The Export PDF to Microsoft Excel Spreadsheet action copies PDF documents and converts them to Microsoft Excel (*.xlsx) format. It contains the following customizable parameters:
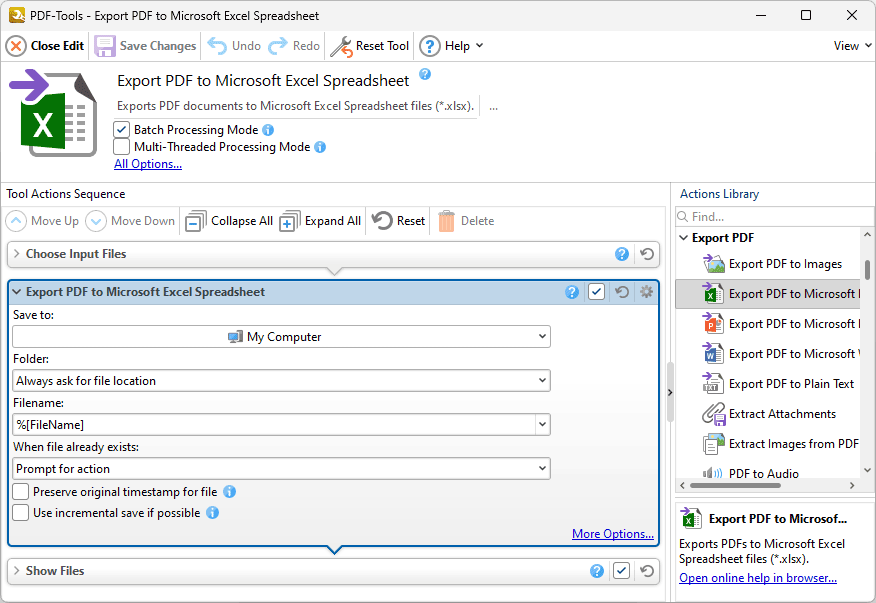
Figure 1. Export PDF to Microsoft Excel Spreadsheet Action Options
•Use the Save to dropdown menu to determine where output files are saved:
•Click My Computer to save files to the local computer.
•Hover over Add Place to add a new place at which to save files, then click Box.com, Dropbox, Google Drive, OneDrive or Sharepoint to add accounts from these locations. PDF-Tools will prompt for the login information for the selected account. When this information has been entered, the account will be detailed in the list and can be used to save files as desired.
•Use the Folder dropdown menu to determine where converted files are saved:
•Always ask for file location prompts the user to select a location each time the action is used.
•Use source folder as destination uses the source folder of input files as the save location.
•Use custom folder specified enables the user to specify a folder. If this option is used then the folder location must be specified in the text box beneath the dropdown menu.
•Use the Filename text box to name output files. The default name is defined by the macro %[Filename], which uses the name of the source file. Click the dropdown arrow to add additional macros.
•Use the When File Already Exists dropdown menu to determine the action taken when filenames are already in use:
•Prompt for action prompts the user for an action to take.
•Overwrite with a new file overwrites the existing file with the new file.
•Keep existing file unchanged retains the existing file and does not save the new file.
•Save new with other unique name inserts a prefix to the filename and then saves the new file.
•Click More Options for further options. The MS Excel File dialog box will open:

Figure 2. MS Excel File Dialog Box
The current settings for exporting files to MS Excel format are detailed in the dialog box.
•Use the Page Range options to determine the page range from which to export pages to MS Excel format. Further information on page range options is available here.
•Click Edit to edit export settings. The Options dialog box will open:
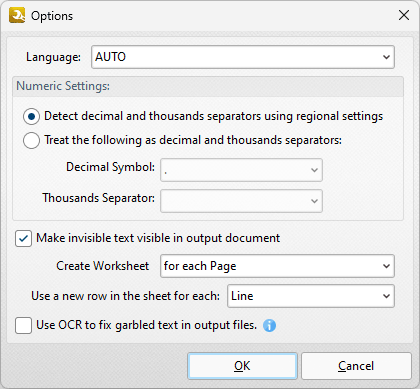
Figure 3. Options Dialog Box
•Use the Language dropdown menu to specify the language of the source document. This setting is necessary in cases where document text has the incorrect encoding and OCR is used to determine the correct unicode to use. AUTO is the default setting and the language is taken from the document properties when it is used.
•Use the Numeric settings to determine the symbols used as decimal points and to delineate thousands in numerical values of one thousand or more:
•Select Detect decimal and thousands separators using regional settings to use the regional settings for decimal points and thousands separators.
•Select Treat the following as decimal and thousands separators to specify either periods or commas for these functions, then select the desired options in the dropdown menus.
•Select the Make invisible text visible in output document to convert invisible text into visible text in output documents.
•Select an option in the Create Worksheet dropdown menu to determine the output option for documents:
•Select for each page to create a worksheet for each page of the input documents.
•Select Single for the document to export the source document to a single worksheet.
•Select either Paragraph or Line in the lower dropdown menu to determine how rows are created in output documents. If Paragraph is selected then each paragraph in the source file is converted to a new row in the output document. If Line is selected then each line in the source file is converted to a new row in the output document.
Click OK to save changes.
Please note that MS Office must be installed on the local computer for this feature to operate, and Save As XPS functionality must be available in the version of MS Office being used. This functionality was added in MS Office 2007.