 Digital Signature Options
Use the options in the Digital Signatures group to perform operations that relate to digital signatures:
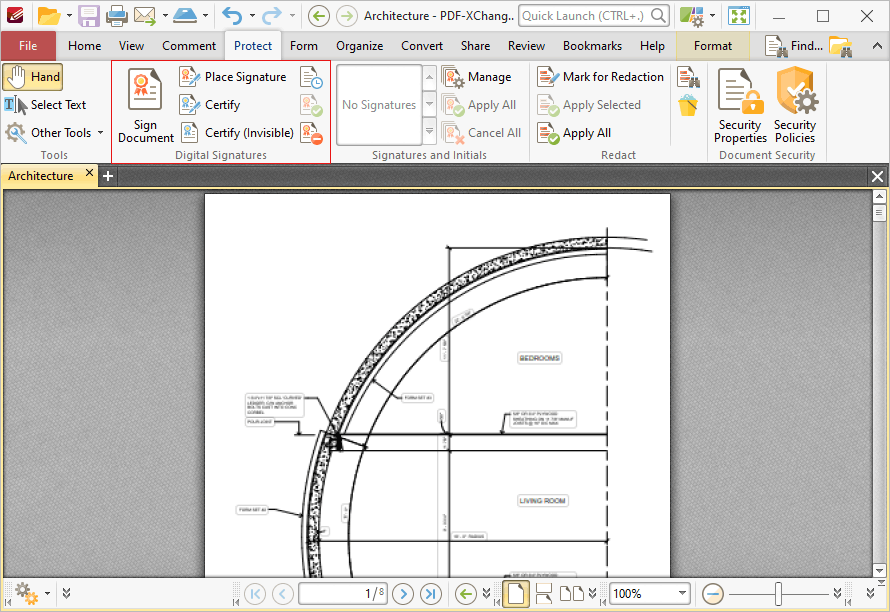
Figure 1. Protect Tab, Digital Signatures Group
Digital signatures are used to demonstrate the authenticity of documents and increase their security. They can also be used to determine editing permissions for documents, and to add timestamp server verification to documents. The Form tab can be used to add digital signature fields to documents. Digital signatures utilize a digital ID in order to operate. Digital IDs are used to create digital signatures and to decrypt documents that have been encrypted for the owner. They contain the information detailed in (figure 3) below, as well as two keys: the public key and the private key. The public key contains the information about its owner, and can be shared by the owner in order for a recipient to encrypt information that is intended only for the owner to view. The public key can also be used to validate the digital signature of the owner. The private key is used to create/apply digital signatures, and to decrypt documents that have been encrypted via certificate security.
Sign Document
Click Sign Document to sign existing signature fields. The dialog box detailed in (figure 2) will open. If more than one signature field is present then it is necessary to select the desired field. If there are no existing signature fields then the pointer will transform into a blue rectangle. This represents a new signature field. Place it at the desired location in the document and then click to create the signature field. The following dialog box will open:

Figure 2. Sign Document Dialog Box
•Select a certificate from the system store or the local computer.
•Click View Certificate to view details about the selected certificate.
•Click Create Certificate to create a new certificate. The dialog box displayed in (figure 3) will open.
•Click the Reason for Signing menu, or enter text into the box manually, to add a reason for signing the document.
•Click the Location box to enter a location as desired.
•Click the Contact Info box to add contact information to the signature.
•Click the Permissions box to determine the changes that are permitted after the document has been signed.
•Click the Sign Template menu to select layout options for the signature and associated information.
•Click Manage to further customize the Sign Template.
•Select the Use Timestamp Server box to select a timestamp server to add to the signature, then select a timestamp server from the dropdown menu. Click Change to view/edit the details of the timestamp server used.
Click OK to add the digital signature to the document.
Creating Digital Certificates
The following dialog box is used to create digital certificates:
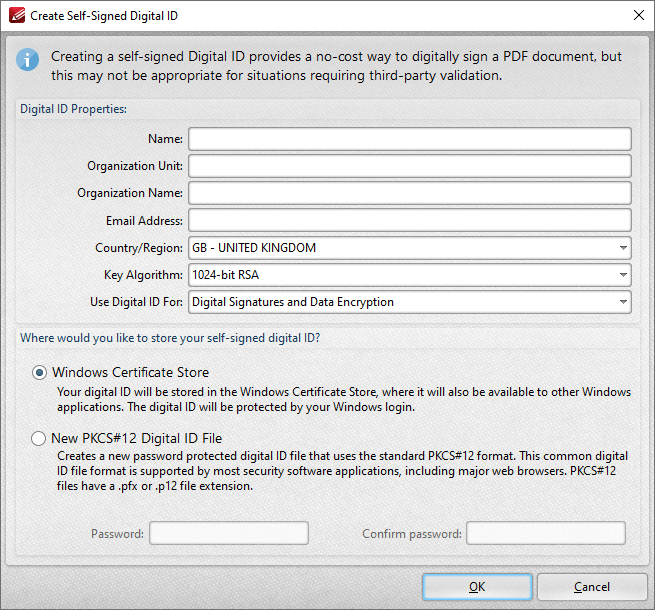
Figure 3. Create Self-Signed Digital ID Dialog Box
•Enter the desired user information in Name, Organization and Email text boxes.
•Use the Country/Region dropdown menu to enter the nationality of the owner of the digital certificate.
•Select either 1024-bit RSA or 2048-bit RSA as the key algorithm. 1024-bit RSA is more universally compatible than 2048-bit RSA, but 2048-bit RSA offers more security.
•Select a storage location for the digital certificate. If the PKCS#12 option is used then enter and confirm a password in the Password text boxes.
Click OK to create the digital certificate. It will then be available in the Use Certificate from System Store dropdown menu detailed in (figure 2).
Place Signature
Click Place Signature to create and sign a digital signature field in one step. A blue rectangle will appear beneath the pointer. This rectangle represents the new signature field. Move it to the desired location and then click to add it to the document. The Sign Document dialog box will open. Follow the instructions as detailed beneath (figure 2).
Certify (Visible) and (Invisible)
Click Certify (Visible) to certify documents and add a visible signature. This process is identical to the Sign Document process detailed above. However, it is only possible to certify documents a single time, whereas is it possible to digitally sign documents multiple times.
Click Certify (Invisible) to certify documents and add an invisible signature. This process is identical to the Certify (Visible) process detailed above, but the physical signature is excluded from the process.
Timestamp
Click Timestamp to add timestamps to documents. The following dialog box will open:
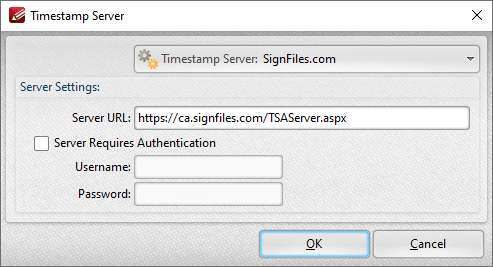
Figure 4. Timestamp Server Dialog Box
Timestamps are used to ensure the long-term preservation of digital signatures, time-seal date objects (to prove when they were received), protect copyrights/intellectual property and provide notarization services.
•Use the Timestamp Server dropdown menu to select a timestamp server.
•If a timestamp server is being used for the first time then enter the website address in the Server URL text box.
•If the selected timestamp server requires authentication then select the indicated box and enter the User Name and Password in the associated text boxes.
Click OK to timestamp documents.
Validate All Signatures
Click Validate All Signatures to validate all document signatures. (Please note that the default settings of the computer on which the files are viewed may result in this happening automatically when documents are opened).
Clear all Signatures
Click Clear All Signatures to clear all digital signatures/certificates from signature fields. Please note that this process does not remove the signature field itself. The Select Fields feature is used for this purpose.
Please note that when digital signatures have been applied to documents and need to be subsequently verified it is necessary to have the incremental save feature enabled. This feature can be enabled/disabled using the Documents settings of the Preferences tab, as detailed here.