 Watermarks
The Watermarks settings are used to add watermarks to printed documents:
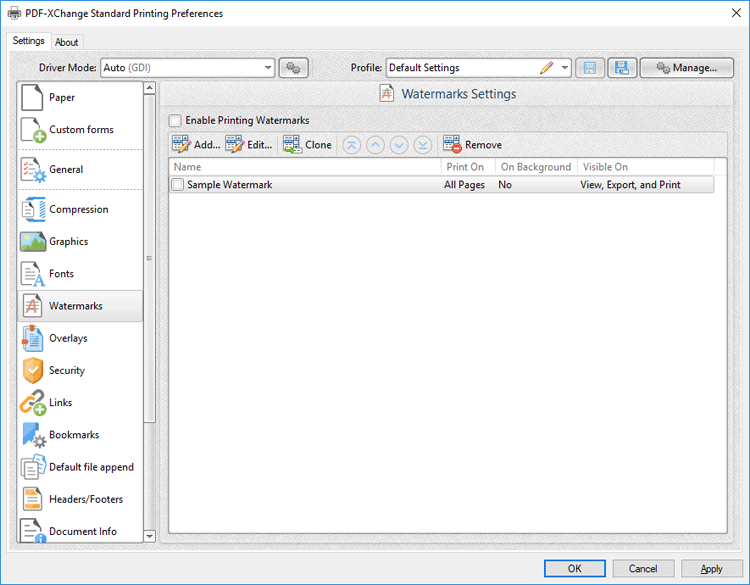
Figure 1. Watermarks Settings Dialog Box
•Select the Enable Printing Watermark box to enable watermark printing. Watermarks selected in the watermarks pane will be added when documents are printed. Note that the Print On, On Background and Visible On columns provide a summary of watermark parameters. Click Edit to adjust these parameters, as detailed in (figure 2) below.
•Click Add/Edit to add/edit watermarks, as detailed in (figure 2) below.
•Click Clone to clone selected watermarks.
•Click Remove to remove selected watermarks.
•Use the blue arrows to adjust the order of watermarks in the list.
Add/Edit Watermark
The options in this dialog box are used to determine the watermark content and style:
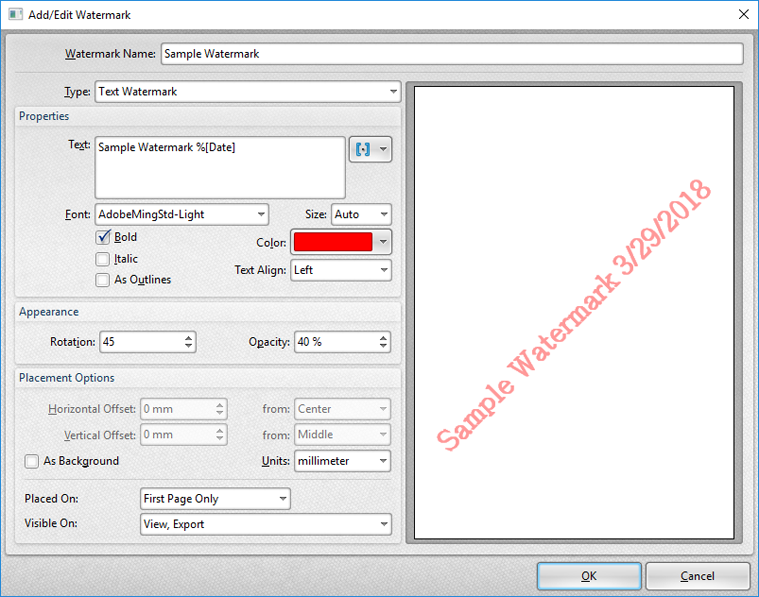
Figure 2. Add/Edit Watermark Dialog Box
•Use the Watermark Name text box to edit the watermark name.
•Use the Type dropdown menu to select either Text Watermark or Image Watermark as desired. Note that text and image watermarks feature different sets of properties. The properties for text watermarks are detailed in (figure 2) and explained below. The properties for image watermarks are detailed in (figure 3).
•Use the Text text box to edit the watermark text. Click the blue icon to add macros as desired. The sample watermark in (figure 2) utilizes the %[Date] macro.
•Select an option in the Font dropdown menu to edit the watermark font.
•Use the Size dropdown menu to determine the size of the watermark font.
•Select the Bold, Italic and/or As Outlines boxes as desired.
•Use the Color dropdown menu to determine the font color.
•Select an option from the Text Align dropdown menu to determine the watermark text alignment.
•Use the Rotation and Opacity number boxes to determine the rotation and transparency of watermarks.
•Use the Horizontal/Vertical Offset number boxes to determine the offset of watermarks on the horizontal and vertical axes. Select options in the from dropdown menus to determine the location from which offsets are made.
•Select the As Background box to add watermarks as backgrounds.
•Use the Placed On dropdown menu to determine on which pages watermarks are placed.
•Use the Visible On dropdown menu to determine when watermarks are visible.
Image Watermark Properties
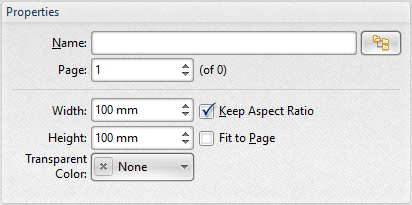
Figure 3. Image Watermark Properties
•Enter the name of the file to be used in the Name text box, or click the icon to select a file manually.
•Use the Page number box to specify the page number used from the source document to create the watermark.
•Use the Width and Height number boxes to determine the width and height of the watermark.
•Select the Keep Aspect Ratio box to retain the aspect ratio of the image.
•Select the Fit to Page box to fit the image to the dimensions of the page on which it is printed.
•Use the Transparent Color dropdown menu to determine the color of transparent elements of watermarks.
Click OK to save watermarks.