 Add Digital Signature
The Add Digital Signature action uses a certificate-based digital ID to add and sign signature fields in input documents. It contains the following cusomizable parameters:
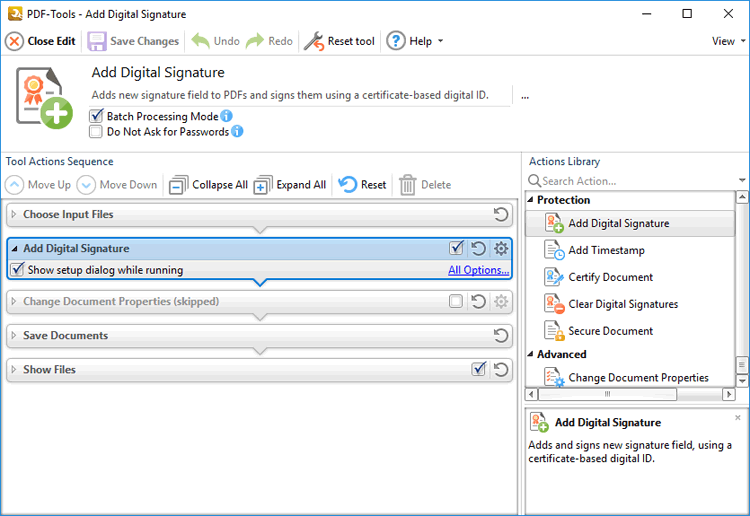
Figure 1. Add Digital Signature Action Options
•Click All Options to view/edit all options. The Sign Document dialog box will open, as detailed below.
•Select the Show setup dialog while running box to launch the Sign Document dialog box and customize settings each time this action is used. Clear this box to disable the Sign Document dialog box from opening each time the action is used, which is useful when the same settings are used consistently.

Figure 2. Sign Document Dialog Box
•Select a certificate from the system store or the local computer.
•Click View Certificate to view details about the selected certificate.
•Click Create Certificate to create a new certificate. The dialog box displayed in (figure 3) will open.
•Click the Reason for Signing menu, or enter text into the box manually, to add a reason for signing the document.
•Click the Location box to enter a location as desired.
•Click the Contact Info box to add contact information to the signature.
•Click the Permissions box to determine the changes that are permitted after the document has been signed.
•Click the Sign Template menu to select layout options for the signature and associated information.
•Click Manage to further customize the Sign Template.
•Select the Use Timestamp Server box to select a timestamp server to add to the signature, then select a timestamp server from the dropdown menu. Click Change to view/edit the details of the timestamp server used.
•Use the Placement Options to determine the location at which the digital signature is added to input documents:
•Enter the page number in the To Page number box, or select the To Last Page box to add the digital signature to the last page.
•Click and drag the bounding box in the preview pane to position the signature field manually and/or resize its dimensions.
•Alternatively, use the number boxes to determine the location and dimensions of the digital signature.
•Click the Page Size button to set the page size/orientation of the page in the preview pane.
Click OK to save changes.
Creating Digital Certificates
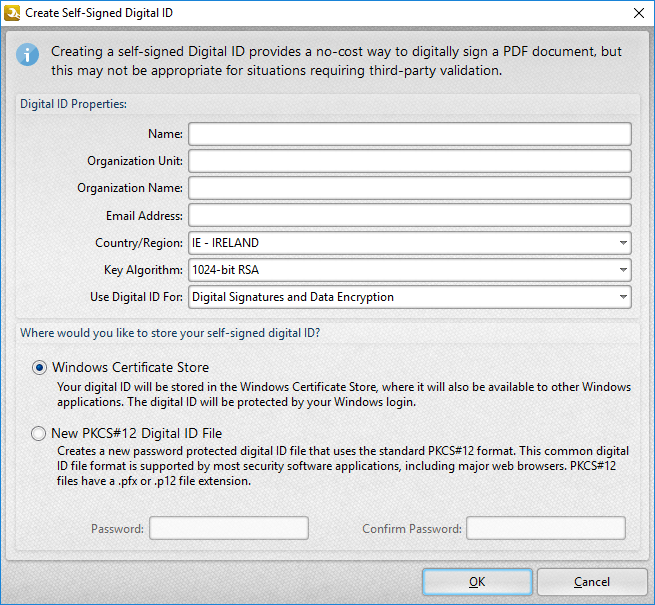
Figure 3. Create Self-Signed Digital ID Dialog Box
•Enter the desired user information in Name, Organization and Email text boxes.
•Use the Country/Region dropdown menu to enter the nationality of the owner of the digital certificate.
•Select either 1024-bit RSA or 2048-bit RSA as the key algorithm. 1024-bit RSA is more universally compatible than 2048-bit RSA, but 2048-bit RSA offers more security.
•Select a storage location for the digital certificate. If the PKCS#12 option is used then enter and confirm a password in the Password text boxes.
Click OK to create the digital certificate. It will then be available in the Use Certificate from System Store dropdown menu detailed in (figure 2).