 Add Timestamp
The Add Timestamp action adds document-level timestamps to PDF documents. Timestamps are obtained from a specified timestamp authority and establish exact file content at the time of stamping. The following options are available when this action is placed in the Tool Actions Sequence:
![]()
Figure 1. Add Timestamp Options
•Show setup dialog while running is explained here.
•Click All Options to determine further options:
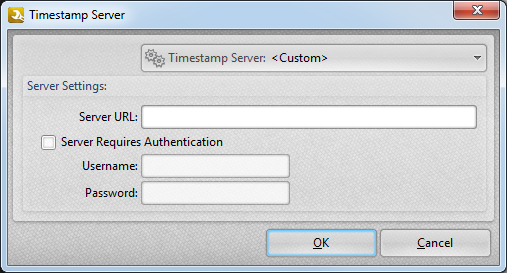
Figure 2. Timestamp Server Dialog Box
•Use the Timestamp Server dropdown menu to select/view/manage timestamp servers:
•Use the Server Settings text boxes to add new timestamp servers:
•Enter the website address of the server in the Server URL text box.
•Select the Server Requires Authentication box to require authentication when time stamps are added. Add required details in the Username and Password text boxes.
Use the Timestamp Server dropdown menu to save new timestamps:
•Click ![]() Save Current Settings to save custom settings.
Save Current Settings to save custom settings.
•Click ![]() Delete to delete the custom preset mode currently selected.
Delete to delete the custom preset mode currently selected.
•Click ![]() Manage to manage custom preset modes.
Manage to manage custom preset modes.
Click OK to save settings. Then, in the Edit Tools window:
•Click ![]() Save Changes to save new settings.
Save Changes to save new settings.
•Click ![]() Close Edit to end the current edit and revert to previous settings.
Close Edit to end the current edit and revert to previous settings.