 Form Toolbar
The Form Toolbar enables options for adding and editing document form fields. Click Edit Form to enable the Form Toolbar options:

Figure 1. Edit Form Button, Form Toolbar
![]() The Select Fields mode is used to select and move fields. Click a field to select it. Click and drag to move fields.
The Select Fields mode is used to select and move fields. Click a field to select it. Click and drag to move fields.
![]() The Keep Mode setting is used to retain the selected form mode. If this mode is enabled then it is possible to create several forms consecutively. If it is disabled then the selected mode will revert to the Select Fields mode after a single use.
The Keep Mode setting is used to retain the selected form mode. If this mode is enabled then it is possible to create several forms consecutively. If it is disabled then the selected mode will revert to the Select Fields mode after a single use.
![]() The Text Field mode is used to add text fields to documents. Text fields are used to denote a space in which users can can enter text, such as their address or credit card details. See here for further information.
The Text Field mode is used to add text fields to documents. Text fields are used to denote a space in which users can can enter text, such as their address or credit card details. See here for further information.
![]() The Check Box mode is used to add check boxes to documents. Check boxes allow users to make a binary choice between mutually exclusive options, such as yes/no answers. See here for further information.
The Check Box mode is used to add check boxes to documents. Check boxes allow users to make a binary choice between mutually exclusive options, such as yes/no answers. See here for further information.
![]() The Radio Button mode is used to add radio buttons to documents. Radio buttons allow users to choose only one of a predefined set of options, such as when answering multiple choice questions. See here for further information.
The Radio Button mode is used to add radio buttons to documents. Radio buttons allow users to choose only one of a predefined set of options, such as when answering multiple choice questions. See here for further information.
![]() The List Box mode is used to add a list of choices to documents. List boxes allow users to select one or more items from a list of options contained within a static, multiple line text box, such as a list of months of the year. See here for further information.
The List Box mode is used to add a list of choices to documents. List boxes allow users to select one or more items from a list of options contained within a static, multiple line text box, such as a list of months of the year. See here for further information.
![]() The Dropdown mode is used to add dropdown menus to documents. Dropdown menus allow users to select only one value from a list of options contained within a static, multiple line text box, such as a list of nationalities. See here for further information.
The Dropdown mode is used to add dropdown menus to documents. Dropdown menus allow users to select only one value from a list of options contained within a static, multiple line text box, such as a list of nationalities. See here for further information.
![]() The Button mode is used to add action buttons to documents. Buttons allow users to trigger an event/action, such as opening a web link or playing a sound. See here for further information.
The Button mode is used to add action buttons to documents. Buttons allow users to trigger an event/action, such as opening a web link or playing a sound. See here for further information.
![]() The Digital Signature mode is used to add digital signature fields to documents. Digital signature fields allow users to sign documents digitally, which increases security and integrity. See here for further information.
The Digital Signature mode is used to add digital signature fields to documents. Digital signature fields allow users to sign documents digitally, which increases security and integrity. See here for further information.
![]() The Barcode mode is used to add barcodes to documents. Barcodes translate form data into an encoded pattern that compatible devices can read and archive, which increases security and efficiency. See here for further information.
The Barcode mode is used to add barcodes to documents. Barcodes translate form data into an encoded pattern that compatible devices can read and archive, which increases security and efficiency. See here for further information.
![]() The Date mode is used to add customized text fields that feature date functionality to documents. The settings are identical to the Text Field mode, detailed above, with the exception that created fields feature date functionality by default.
The Date mode is used to add customized text fields that feature date functionality to documents. The settings are identical to the Text Field mode, detailed above, with the exception that created fields feature date functionality by default.
![]() The Image mode is used to add customized button fields to documents. The settings are identical to the Button mode, detailed above, but the default layout is slightly different, and Javascript is added automatically to enable the insertion of images to be submitted as form data.
The Image mode is used to add customized button fields to documents. The settings are identical to the Button mode, detailed above, but the default layout is slightly different, and Javascript is added automatically to enable the insertion of images to be submitted as form data.
Right-Click Shortcut Menu for Form Fields
When form fields are right-clicked the following options are displayed:
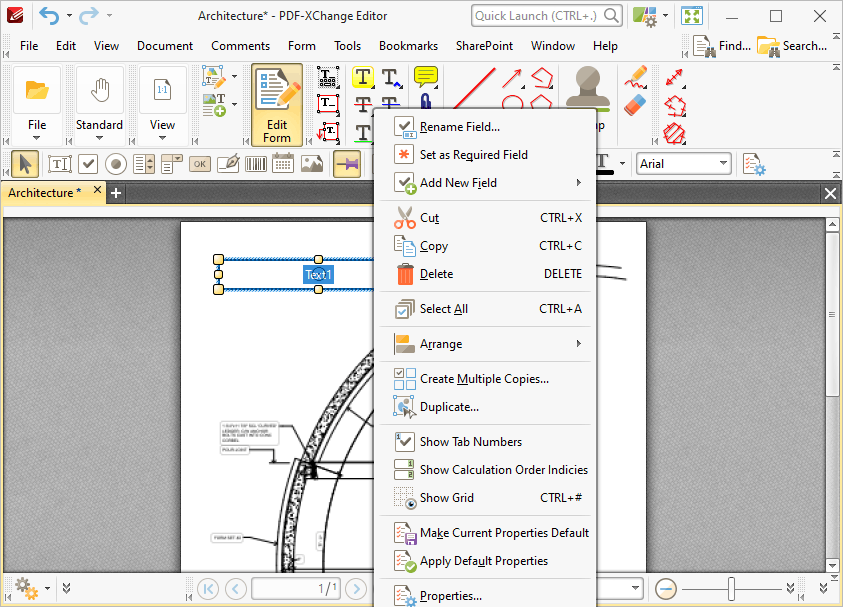
Figure 2. Right-Click Form Options
•Click Rename Field to rename selected fields.
•Click Set as Required Field to designate selected field as required, which means it must be filled before the document can be submitted. These fields will also be highlighted when the Highlight Required Fields Only option outlined here is utilized.
•Click Add New Field to add new form fields to documents. Available forms are detailed above.
•Click Cut, Copy or Delete to cut/copy/delete selected forms.
•Click Select All to select all form fields.
•Click Arrange to arrange multiple fields. This option is available only when multiple fields are selected. If the form fields were group-selected with the mouse, then the first form placed in the document is used as the reference point to arrange the other forms. If the form fields were group-selected by holding Ctrl and selecting them one at a time, then the first form selected will be used as the reference point. The Arrange options for form fields are detailed below:
•Align Left Edges
•Align Horizontal Centers
•Align Right Edges
•Align Top Edges
•Align Vertical Centers
•Align Bottom Edges
•Align to Selection aligns selected forms to Selection Bounds, Key Object or Page as desired.
•Distribute Horizontally
•Distribute Vertically
•Make Same Width
•Make Same Height
•Make Same Size
•Bring Forward, which brings the selected form field up a step in cases where multiple forms overlap.
•Send Backward, which sends the selected form field back a step in cases where multiple forms overlap.
•Bring to Front, which brings the selected form field to the top in cases where multiple forms overlap.
•Send to Back, which sends the selected form field to the back in cases where multiple forms overlap.
•Click Create Multiple Copies to create copies of selected forms. See (figure 3) for further information.
•Click Duplicate to duplicate selected forms to a specific page range. Page offsets can be added for duplicates as desired. See (figure 4) for further information.
•Click Show Tab Numbers to display automated tab numbers in each form field. These numbers represent the tab order when the Tab key is used to navigate between forms.
•Click Show Grid to activate the grid feature, which displays in the background of documents and assists in the placement of objects.
•Click Make Current Properties Default to set the properties of the form field currently selected as the default properties for all subsequent forms of the same format.
•Click Apply Default Properties to apply the default properties to the selected form field.
•Click Properties to launch the Properties pane, which can be used to view/edit the properties of selected fields.
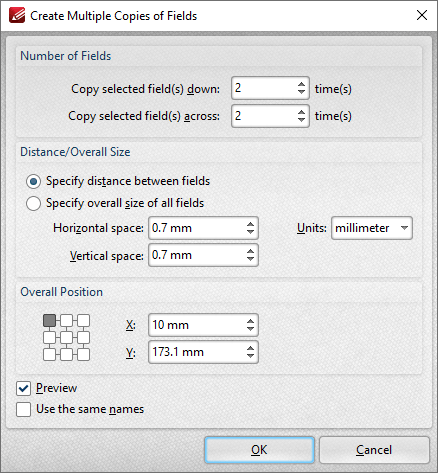
Figure 3. Create Multiple Copies of Fields Dialog Box
•The figure entered in the the Copy selected fields down number box determines the amount of copies placed vertically below source fields.
•The figure entered in the the Copy selected fields across number box determines the amount of copies placed horizontally from source fields.
•Select Specify distance between fields to determine the distance between copies. Enter the desired distances in the Horizontal space and Vertical space number boxes.
•Select a unit of measurement from the Units menu.
•Select Specify overall size of all fields to determine the size of the area in which fields are multiplied. The value entered in the Overall width and Overall height number boxes determines the overall width and height of the area in which the selected field is multiplied. Select the desired units of measurement from the Units menu.
•The Overall Position settings can be used to determine the overall position of copied fields. Edit the X and Y values as desired. The position selected in the grid determines the starting point for measurements when multiple copies of form fields are created.
•Select the Preview box to place a preview before the creation of copied fields.
•Select the Use the same names box as desired. This is useful for fields that require the same user data or other elements such as the current date. Copies will feature the same name as source fields, followed by a unique number.
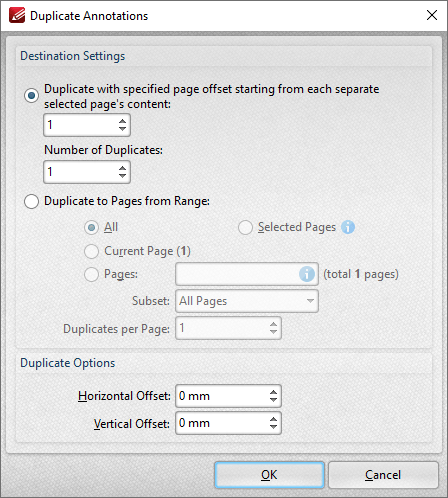
Figure 4. Duplicate Annotations Dialog Box
•Use the Destination Settings to determine the output settings for duplicated forms:
•Select the upper option button to duplicate forms through a specified page offset from the source form. Enter the desired page offset in the upper number box and the number of duplicates in the lower number box. For example, if the page offset is specified as '3' and the number of duplicates is specified as '3', then three duplicates will be created, with one placed on every third page starting from the source form.
•Select the lower option button to duplicate forms to a specified page range:
•Click All to select all document pages.
•Click Current Page to duplicate the form on only the current page.
•Click Pages to determine a page range. See here for page range options.
•Use the Subset option to select All Pages, Odd Pages Only or Even Pages Only for page ranges.
•Use the Duplicates per Page number box to specify the number of duplicate forms created per page.
•Use the Duplicate Options settings to determine the duplication of selected forms:
•The value entered in the Horizontal Offset number box determines the horizontal offset from the duplicated field.
•The value entered in the Vertical Offset number box determines the vertical offset from the duplicated field.
Tab Order of Forms
Please note that the Tab key can be used to scroll through text field forms after they have been added to documents. Follow the instructions below to change the tab order of forms:
1. Click View in the MenuToolbar.
2. Hover over Other Panes.
3. Click Fields. The Fields pane will open.
4. Click Options. The Options submenu will open.
5. Click Order by Pages. Then click the Edit Form tool in the Shortcut Toolbar.
6. Click and drag fields within the Fields pane to reorder them.