 Stamp Tool
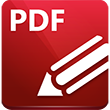
Click Stamp Tool to add stamps to documents:
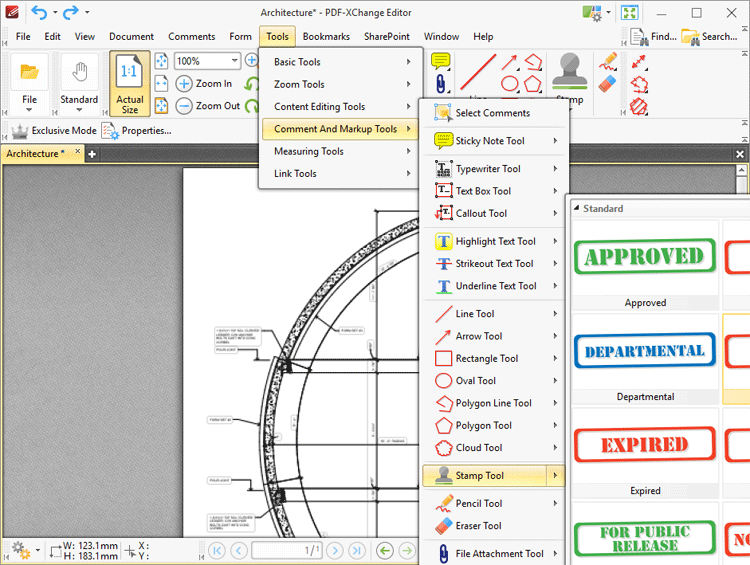
Figure 1. Tools Tab Submenu. Stamp Tool
When the Stamp Tool is selected, the active stamp will be displayed beneath the pointer. Move the pointer to the desired location and click to add stamps:
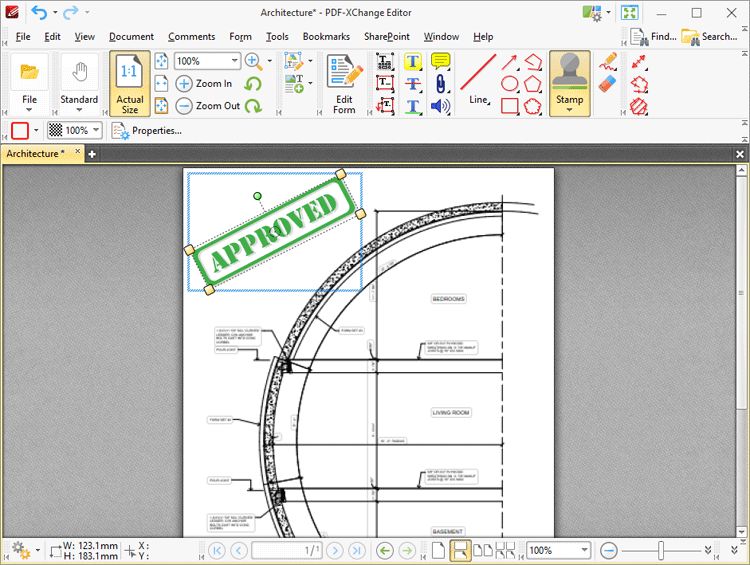
Figure 2. Sample Stamp
•Click and drag the yellow control points to resize stamps. Please note that stamp proportions are constrained.
•Click and drag stamps to reposition them.
•Click and drag the green control point to rotate stamps. Hold down Shift to rotate at increments of fifteen degrees.
•Use the arrow keys to reposition stamps. Hold down Shift to move at an increased increment.
•Use the editing aids detailed here to assist in the precise placement of stamps.
•Right-click stamps for further options. See here for an explanation of these options.
•When the Stamp Tool is selected, the following options are enabled in the Properties Toolbar:
•Stroke Color determines the color of pop-up notes associated with stamps. (The color of default stamps is fixed and can only be adjusted after stamps have been flattened. However, new stamps can be created as desired - see below).
•Opacity determines the level of transparency in stamps.
•Keep Selected determines whether or not the Stamp Tool remains selected after a stamp has been created. If this option is enabled then the tool will remain selected and can be used to create several stamps consecutively. If this option is not enabled then PDF-XChange Editor will revert to the designated default tool immediately after creating a stamp.
•Exclusive Mode simplifies the process of using the Stamp Tool. When Exclusive Mode is enabled, the pointer ignores all interactive elements of documents other than base content. This makes it possible to create stamps on areas that overlap with other content without the risk of accidentally selecting undesired items. When Exclusive Mode is disabled, the pointer recognizes and interacts with all underlying elements in the usual manner.
•Click Properties to view/edit the Stamp Tool Properties pane. See here for information on tool properties.
•The Commenting section of the Preferences dialog box can be used to view/edit preferences for comments.
Click the arrow beneath the Stamp icon in the Shortcut Toolbar to access the Stamps pane, which details all default and custom stamps:
Figure 3. Stamps Pane
•Click to select stamps. They will then be displayed with the pointer. Click again to add stamps to the active document.
•Click Stamps Palette to open the Stamps Palette, which is a detached version of the Stamps pane. The following options are available:
•Click the Zoom In and Zoom Out icons to zoom in on/out from available stamps.
•Click Add New for stamp creation options:
•Click Add New Stamp from File to create a stamp from a document saved on the local computer. The Open Files dialog box will open. Select a file and click Open. The file will be displayed in the Add New Stamp dialog box, which is detailed in (figure 4).
•Click New Stamp from Selection to create a stamp from selected content in the active document.
•Click New Stamp from Active Document to create a new stamp from the active document.
•Click New Stamp from Clipboard to create a new stamp from the current clipboard content.
•Click Rename/Delete to rename/delete selected stamps. Note that the default stamps cannot be renamed/deleted.
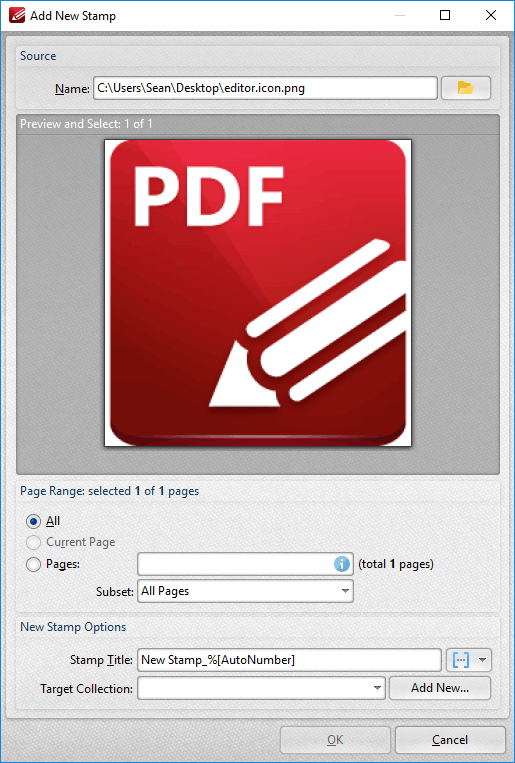
Figure 4. Add New Stamp Dialog Box
•Use the Name text box, or click the folder icon, to select a file to use as the stamp.
•The Page Range options determine the pages of the file that will be used for the stamp:
•Select All to use all the pages of the file.
•Select Current Page to use only the current page.
•Select Pages to specify pages from the file. See here for further information. Note that if more than one page is selected then a new stamp will be created for each page.
•Enter a name in the Stamp Title text box. Click the blue icon to include macros as desired.
•Use the Target Collection menu to determine the collection in which the new stamp will be located.
•Click Add New to create a new stamp collection.
Click OK to create new stamps.
Please note the following:
•Images are usually in raster format and will pixellate if zoomed to a high degree. Therefore it is advisable to create stamps from pre-sized images. (Vector-based images do not experience this issue).
•If a transparent background is desired for stamps then a suitable image format must be used. The formats *.gif and *.png support transparency but *.jpg and *.pdf do not. N.b. Microsoft Paint does not handle *.png transparency well, but most modern graphics programs, such as GIMP, are compatible with *.png transparency. A free GIMP download is available here.
•PDF files that contain transparent images/objects without backgrounds (such as scanned signatures) can also be used to create transparent stamps - empty space on the page will be ignored.
If PDF-XChange Editor Plus has been purchased, then the additional features below are also available:
Add Dynamic Elements to Stamps
Follow the steps below to add JavaScript to stamps:
1. Move to the Stamps Palette.
2. Click Add New Stamp from File:
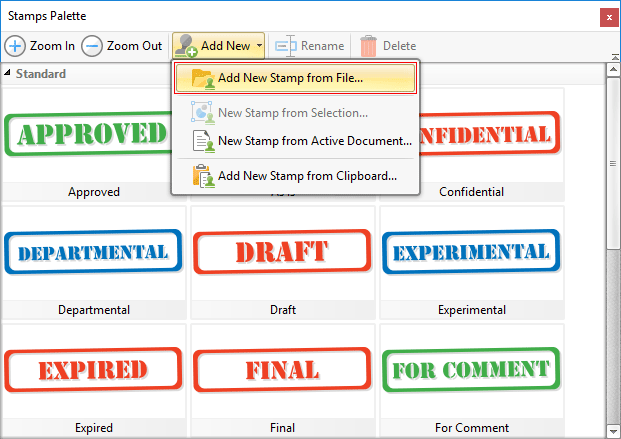
Figure 5. Stamps Palette, Add New Stamp from File
3. Select the desired file, then follow the steps outlined beneath (figure 4) to create and save a new stamp.
4. Close PDF-XChange Editor.
5. Open the file that contains the stamp. Note that the default folder is %appdata%\Tracker Software\PDFXEditor\3.0 and all custom stamps are stored in the same file.
6. Move the file to the desktop. (This is a necessary step due to encoding parameters - if it is not included then the changes cannot be saved).
7. Open the file in PDF-XChange Editor.
8. Use the Form Toolbar to add a text field to the stamp. (If you want the borders of the text field to be invisible then set the stroke color to None. The stroke color setting is available in the Properties Toolbar when the text field is selected).
9. Click Select Fields in the Form Toolbar, then right-click the text field and click Properties in the submenu. The Properties pane will open.
10. Scroll down to the Value Calculation property, then select Custom Action in the Calculation dropdown menu. The entry 'Calculate action / Run a JavaScript' will appear at the bottom of the Properties pane:
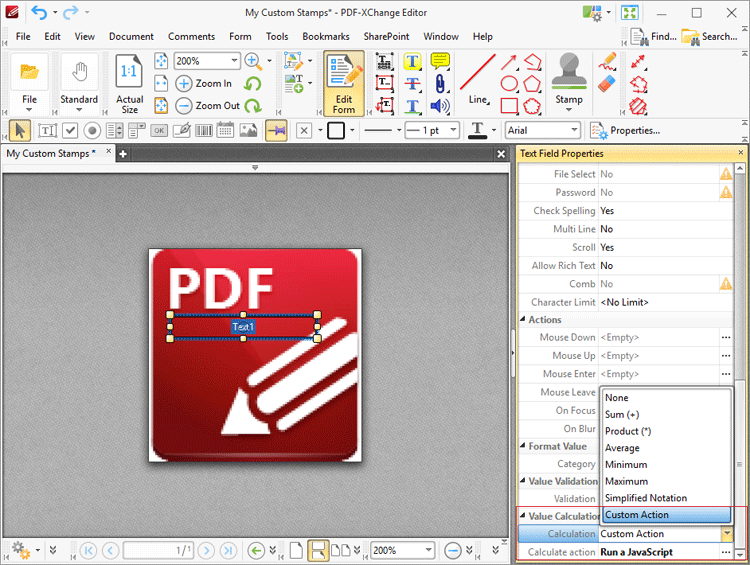
Figure 6. Dynamic Stamp Creation
11. Click the ellipsis icon (three dots) on the right of the 'Calculate action / Run a JavaScript' property. The Edit Action: "Run a JavaScript" dialog box will open.
12. Enter the desired JavaScript and click OK.
13. Save the file and close PDF-XChange Editor.
14. Return the stamp file to its original destination folder. The updated stamp will then be available in the specified stamp collection.
For example, entering the following JavaScript returns the time and date when the stamp is added to the document:
var d = new Date;
event.value = util.printd("yyyy/mm/dd/ HH:MM:ss", d);
Please note that form content is evaluated immediately before stamps are placed and flattened immediately afterwards. The software will recognize it as a stamp, as opposed to a form field, despite the fact that it includes form field elements. Note that only the text field and barcode forms are compatible with this process - the other form fields do not retain their functionality.
Add Numbering to Stamps
Follow the steps below to add numbering to stamps:
1. Use the steps detailed above to create a dynamic stamp and enter the following JavaScript at step twelve:
if (event.source.forReal && (event.source.stampName == "TCS9kAUOm4Abn56QZCOZE3"))
{
var counter = 0;
if (typeof event.source.source.info.stampCounter != undefined)
{
counter = event.source.source.info.stampCounter;
}
counter++;
event.source.source.info.stampCounter = counter;
event.value = counter;
}
else
{
event.value = 1;
}
2. Save the file and close PDF-XChange Editor.
3. Return the stamp to its destination folder. (It should have been moved to the desktop at step seven of the process - see steps for adding dynamic elements to stamps, above).
4. Open PDF-XChange Editor and create a new document.
5. Place the stamp in the new document and select it.
6. Press Ctrl+J. The JavaScript Console will open. Enter the following JavaScript:
this.selectedAnnots[0].AP
7. Click Run in the JavaScript Console.
8. An alphanumeric string will appear in the lower section of the JavaScript Console. Copy this string to the clipboard.
9. Close PDF-XChange Editor.
10. Move the stamp from its destination folder to the desktop.
11. Open PDF-XChange Editor and open the stamp.
12. Click Select Fields in the Form Toolbar, then select the text field of the stamp.
13. Click Properties in the Edit tab.
14. Under the Value Calculation property, use the menu to select Custom Action. The entry Calculate action / Run a JavaScript will appear at the bottom of the Properties pane.
15. Click the ellipsis icon on the right of the Calculate action / Run a JavaScript property. The Edit Action: "Run a JavaScript" dialog box will open.
16. Replace the alphanumeric string on line one of the JavaScript Console with the alphanumeric string in the clipboard.
17. Save the file and close PDF-XChange Editor.
18. Move the file from the desktop to its original folder. The stamp will then feature incremental numbering when it is placed in documents.
A complete list of JavaScript-supported actions is available here.