 User Interface
The PDF-Tools user interface has two workplaces: the Main window and the Edit Tools window.
Main Window
The Main window is used to view, select, edit, clone or launch tools. All tools feature a Tool Actions Sequence that dictates how it runs. The Tool Actions Sequence is composed of actions from the Actions Library that run in sequence to create the functionality of the tool. These actions are contained in the Tool Info pane, as detailed below. The actions that tools perform are listed in the order that the tool performs them. A selected box![]() indicates that the associated action is included in the action sequence of the tool. Clear boxes (where possible) to skip actions. For example, the Convert Files to PDFs tool is composed of the following actions:
indicates that the associated action is included in the action sequence of the tool. Clear boxes (where possible) to skip actions. For example, the Convert Files to PDFs tool is composed of the following actions:
•Ask for Source Files
•Convert Files to PDF
•Change Document Properties
•Save Documents
•Show Files
This means that the tool will ask the user for input files, convert them to PDF, change document properties, save files according to user requirements and then highlight the new files in the containing folder on the desktop. Expand actions in the Tool Info pane to view customizable settings. These settings are explained in the Actions Library. The Main window is displayed below:
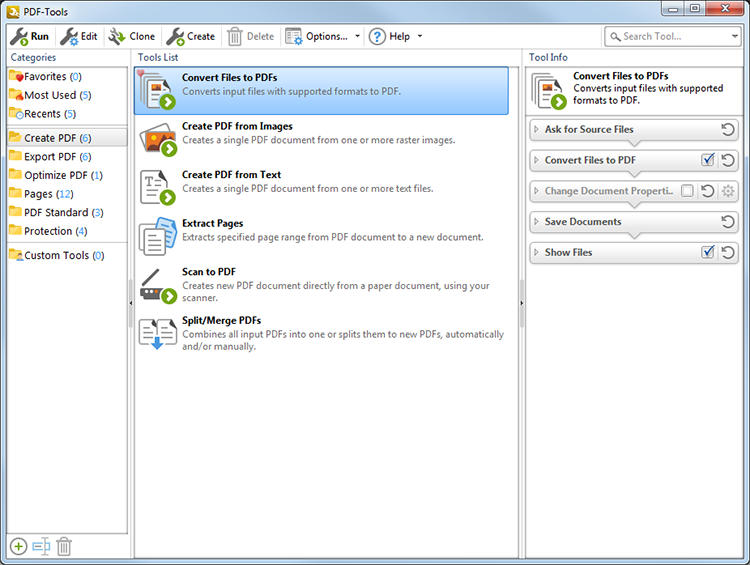
Figure 1. Main Window
There are seven tabs in the Main Toolbar:
![]() Run launches the selected tool.
Run launches the selected tool.
![]() Edit launches the Edit Tools window for the selected tool.
Edit launches the Edit Tools window for the selected tool.
![]() Clone creates a clone of the selected tool, which enables full customization of the actions it contains.
Clone creates a clone of the selected tool, which enables full customization of the actions it contains.
![]() Create launches the Edit Tools window to create a new tool.
Create launches the Edit Tools window to create a new tool.
![]() Delete removes the selected tool. This option is only available for custom tools.
Delete removes the selected tool. This option is only available for custom tools.
![]() Options contains the following options:
Options contains the following options:
•Preferences launches the Preferences dialog box, which can be used to customize the user experience and adjust the application settings. See here for further information.
•Export All Settings exports the current settings and custom tools to a file. This is a useful feature if several parties require the same settings.
•Import All Settings imports settings from a file that the Export All Settings option has been used to create.
•Reset All Settings resets all program options to their default settings and removes all custom tools.
•Export Tools exports all tools to a file for subsequent use. This is a useful feature if several parties require the same customized tools.
•Import Tools imports tools from a file that the Export Tools option has been used to create.
![]() Help contains options that assist in using the software:
Help contains options that assist in using the software:
•Contents launches online help.
•Home Page launches the PDF-Tools page on the Tracker Software Products website.
•Support launches the support forums.
•Enter License Key is used to view/add license keys.
•Check for Updates is used to check for updates for all Tracker Software applications installed on the local computer.
•About is used to display license/version information and further details about Tracker Software Products.
The Search Tool text box is also located in the main toolbar. Use this feature to search for tools according to their name/description. Click the arrow to view previous search terms.
Right-click tools for additional options:
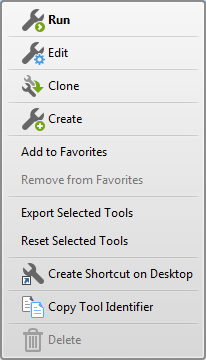
Figure 2. Tool Options Menu
•Click Add to Favorites to add tools to the Favorites folder.
•Click Remove from Favorites to remove tools from the Favorites folder.
•Click Export Selected Tools to export selected tools. The Save Export File dialog box will open. Select a name and location for the file. Selected tools will be saved as a .pdtex file. The Import Tools option outlined above can be used to import tools subsequently. This is a useful feature for customized tools that multiple users require.
•Click Reset Selected Tools to revert settings to their default value for selected tools.
•Click Create Shortcut on Desktop to create a desktop shortcut for selected tools. This feature makes the process of using tools more efficient. For example, if users are only using a single tool then they can create a desktop shortcut to isolate the functionality of that tool. Double-click shortcut icons, or drag and drop files onto them, in order to launch the associated tools.
•Click Copy Tool Identifier to copy the unique tool identifier to the clipboard. This is a useful feature when the command line is used to activate tools.
The Categories pane contains ten folders:
•Favorites contains the tools that the user has designated as their favorite. When the pointer is hovered over tools a heart icon appears at the top-left corner, as in the Convert Files to PDFs tool in (figure 1). Click the heart icon to add tools to the Favorites folder. Alternatively, drag and drop tools into the folder.
•Most Used contains the five most frequently used tools.
•Recents contains the five most recently used tools.
•Create PDF contains the tools used to create PDFs:
•Export PDF contains the tools used to export PDFs/images to various output formats:
•Export PDF to Images exports pages from PDFs and converts them into raster image formats.
•Export PDF to Microsoft Excel Spreadsheet exports PDFs to Excel (*.xlsx) format.
•Export PDF to Microsoft Powerpoint Presentation exports PDFs to Powerpoint (*.pptx) format.
•Export PDF to Microsoft Word Document exports PDFs to Word (*.docx) format.
•Export PDF to Plain Text exports PDFs to Plain Text (*.txt) format.
•Extract Images from PDF identifies raster images and then saves them to disk.
•Optimize PDF contains the Optimize PDF tool, which is used to optimize document content and reduce file size.
•Pages contains the tools used to edit document pages:
•Add Bates Numbering inserts Bates numbering into documents.
•Add Header and Footer inserts headers and/or footers into documents.
•Add Watermark inserts watermarks into documents.
•Crop Pages is used to adjust the visible page area.
•Delete Pages is used to delete pages.
•Insert Pages is used to insert pages into documents.
•OCR Pages is used to perform optical character recognition on documents.
•Overlay PDF is used to overlay documents.
•Replace Pages is used to replace pages.
•Resize Pages is used to resize pages.
•Rotate Pages is used to rotate pages.
•Set Pages Background is used to determine page backgrounds.
•PDF Standard contains the tools used to convert to/from PDF standards:
•Convert to PDF/A makes documents compliant with the PDF/A standard, which is used for long-term archiving.
•Convert to PDF/X makes documents compliant with the PDF/X standard, which is used to exchange printing data.
•Discard Special PDF-Standard is used to discard special PDF information from documents, such as PDF/X, PDF/A and PDF/E information.
•Protection contains the tools used to enhance document security:
•Add Digital Signature is used to add digital signature fields to documents and facilitates a certificate-based digital ID to sign them.
•Certify PDFs is used to add certified signatures to documents.
•Secure PDF is used to set document passwords and permission options.
•Timestamp PDFs is used to add timestamps to documents.
•Custom Tools contains custom tools that the Clone Tool or Create Tool feature has been used to create.
Edit Tools Window
Right-click tools and select Edit to view the Edit Tools window for the associated tool. The Edit Tools window is used to view and customize the actions of tools. All actions feature variable parameters that can be adjusted to meet specific requirements. Click the arrow icons next to action names in the Tool Actions Sequence to expand/collapse customizable settings. When viewing custom tools it is also possible to edit the order in which actions take place, although it is necessary to ensure that they meet the ordering requirements. The Convert Files to PDFs tool is selected in the Edit Tools window below:
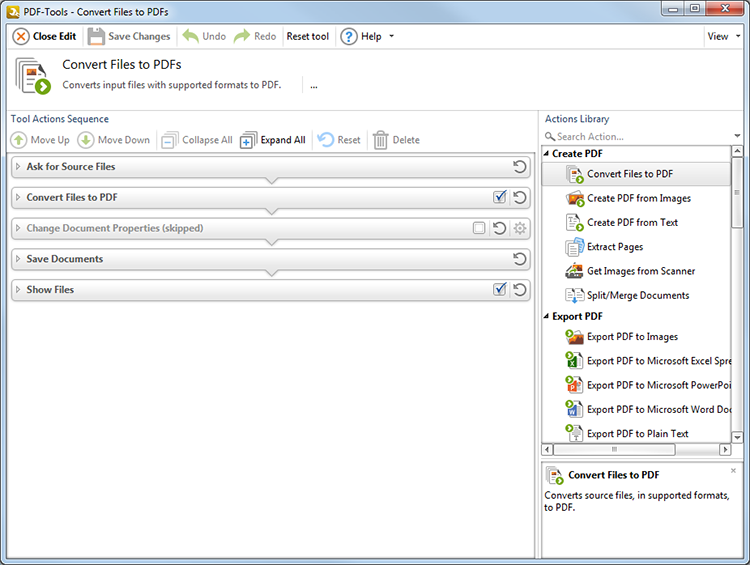
Figure 3. Edit Tools Window
•The Edit toolbar is at the top of the window. See below for further information.
•The name, icon and description of the selected tool is displayed beneath the Edit Toolbar. These parameters can be edited for custom tools only.
•The actions that tools perform are displayed in the Tool Actions Sequence.
•The Actions Library is on the right of the Tool Actions Sequence.
•The text box above the Actions Library can be used to search for actions in the Actions Library.
•The Action Info box is located beneath the Actions Library. This box displays a summary of the selected action.
•Click the View menu in the top-right corner to determine display options for the Actions Library and the Action Info box.
Edit Toolbar
There are six options in the Edit toolbar:
![]() Close Edit ends the current edit.
Close Edit ends the current edit.
![]() Save Changes saves changes made since the tool was last saved.
Save Changes saves changes made since the tool was last saved.
![]() Undo reverses the most recent action.
Undo reverses the most recent action.
![]() Redo reverses the most recent undo.
Redo reverses the most recent undo.
![]() Help opens the help menu.
Help opens the help menu.
![]() Reset Tool reverts adjusted parameters to their default values.
Reset Tool reverts adjusted parameters to their default values.
Tool Actions Sequence
The Tool Actions Sequence is used to add, remove and sequence actions that tools perform. There are six options in the Tool Actions Sequence:
![]() Move Up moves the selected action up one step.
Move Up moves the selected action up one step.
![]() Move Down moves the selected action down one step.
Move Down moves the selected action down one step.
![]() Collapse All collapses all expanded actions.
Collapse All collapses all expanded actions.
![]() Expand All expands all expandable actions.
Expand All expands all expandable actions.
![]() Reset reverts selected actions to their default values.
Reset reverts selected actions to their default values.
![]() Delete removes the selected action from the list.
Delete removes the selected action from the list.
Please note that it is not possible to customize the Tool Actions Sequence of Default Tools. The Create Tool or Clone Tool features must be used to create customizable tools.
A selected box![]() indicates that the associated action is included in the action sequence of the tool. Clear boxes to skip actions when tools run. Mandatory actions do not have check boxes. Click the reset action arrow
indicates that the associated action is included in the action sequence of the tool. Clear boxes to skip actions when tools run. Mandatory actions do not have check boxes. Click the reset action arrow ![]() to reset actions to their default values.
to reset actions to their default values.
Actions Library
The Actions Library displays the forty-two available actions. When an action is selected a summary is displayed in the Action Info box beneath the Actions Library. See Actions Library for further information.